
Step-By-Step Instructions on diagnosing your website and instructions on how to solve the problem.
Look, it happened again this morning.
About 3 months ago, a friend (not client) called me in a real panic. “Jason, can you please help me figure out why my website down? The CEO is at a conference now and I am freaking out!“
I pulled up the site on my phone and it loaded fine for me.
Turned out it was a local caching issue. The site was working fine the entire time and she’d just spent 45 minutes stressed to her eyeballs calling her team, and drafting an angry email to the hosting company. All for a caching issue. Over my 25+ years building and managing digital businesses, I’ve seen this exact scenario play out hundreds of times. Someone thinks their site is down, starts making panicked decisions, maybe even switches hosting providers, when the actual problem was something they probably could have fixed in a few minutes.
On the flip side, I’ve also seen business owners waste days trying to DIY a problem that required professional help from the start. They tinker with server settings they don’t understand, accidentally make things worse, and turn a $100 fix into a multi-thousand dollar emergency.
Today we’re covering how to diagnose most big website issues and what you should and shouldn’t work on if you don’t know what you’re doing.
What This Guide Covers
This is a robust guide/resource for diagnosing and fixing your website. Whether you’re a small business owner, a marketing manager, or someone who just needs their site back up now or someone who needs to know how to do ongoing website support and maintenance.
I’m going to walk you through:
- How to figure out if your site is actually down (or if it’s just you)
- Common problems you can fix yourself in minutes without any technical expertise
- How to diagnose exactly which issue you’re facing using a decision tree
- When to stop and call a professional before you make things worse
- How to prevent this from happening again with a simple maintenance routine
This is the same process I use with my clients at JHMG. It’s systematic, it’s thorough, and it works.
Who This Is For
This guide is written for non-technical business owners and website managers who need their site working but don’t have a developer on speed dial.
You don’t need to know how to code. You don’t need to understand server architecture. You just need to be able to follow instructions and use common sense.
That said, I’m not going to sugarcoat things or dumb them down. I’ll tell you exactly what’s happening, why it matters, and what to do about it. If something requires professional help, I’ll tell you that too.
Time Expectations
Here’s what you’re looking at:
- Initial diagnosis: 5-10 minutes
- Simple fixes you can do yourself: 5-30 minutes depending on the issue
- Waiting for professional help: Could be hours to days depending on the problem and who you call
The bottom line is this: Spending 10 minutes on proper diagnosis can save you hours or days of troubleshooting the wrong problem.
I’ve seen businesses lose thousands of dollars in revenue because they spent two days trying to fix a hosting issue when their domain had simply expired. Don’t be that person.
Let’s dig in ⛏️
II. Is Your Website Really Down?
Before you do anything; before you call your developer, before you panic email your hosting company, before you do literally anything, you need to answer one simple question:
Is the site down for everyone, or just for you?
This is CRITICAL. Because sometimes your site is running perfectly fine. The problem is your computer, your phone, your browser, your internet connection, or your local network. And if that’s the case, you’re about to waste a lot of time and possibly money troubleshooting the wrong thing.
In my experience, about 30% of “my site is down” emergencies are these issues. Your customers may be fine, so just check this stuff first. Unless, of course, multiple (not one, multiple) customers are calling to tell you that your site is down. In that case, it’s probably down.
So let’s figure out which situation you’re in.
A. Check If It’s Just You
Use Third-Party Checking Tools
The fastest way to check if it’s just you? Let someone else’s server try to access your site.
This is usually my first stop. Here’s what you do:
- Go to DownDetector.com
- Enter your domain name in the search box
- Look at the real-time reports from other users
What you’re looking for: If there’s a spike in reports, your site is likely down for multiple people. If the chart is flat and shows “No problems detected,” it’s probably just you.
The key here is that DownDetector aggregates reports from actual users. It’s crowdsourced data, which means if your site is having widespread issues, you’ll see it immediately.
IsItDownRightNow.com:
This one gives you more technical details:
- Go to IsItDownRightNow.com
- Enter your domain
- Check the results
You’ll get a clear message: either “It’s not just you!” (meaning the site is actually down) or “It’s just you” (meaning the site is up and your problem is local).
The site also shows server response time, which can help you identify if your site is up but loading slowly, a different problem entirely, and one we’ll address later in this guide.
UptimeRobot.com (If You Have It Set Up):
If you’ve been smart and set up uptime monitoring (and if you haven’t, we’ll fix that in Section VI), check your UptimeRobot dashboard. It’ll show you:
- Current status
- Historical uptime data
- Exactly when any outages occurred
More than anything, this gives you confidence in your diagnosis. If UptimeRobot says your site has been up for the last 30 days straight, and you suddenly can’t access it? The problem is on your end.
The Mobile Phone Test
This is my favorite quick-and-dirty test because it bypasses all your local network weirdness.
Step 1: Turn OFF wifi on your phone
Step 2: Use cellular data only
Step 3: Try to visit your site
Why this works: You’re now accessing your site from a completely different network and device. You’ve eliminated your home internet, your router, your computer, and your browser from the equation.
What it tells you:
- Site loads on your phone with cellular data = The problem is your computer or network
- Site doesn’t load on your phone = You’ve got a real problem
I use this test constantly. It takes literally 15 seconds and gives you incredibly valuable information.
Ask a Friend (Or Use a VPN)
Sometimes you need a second opinion from a completely different location.
Text a friend, ideally someone in a different city or state, and ask them to visit your site. If it loads for them but not for you, you’ve got your answer.
Don’t have a friend handy? (I’m not judging.) Use a VPN to test from different geographic locations. Connect to a server in a different city and try accessing your site. Same principle.
Pro tip: Share this article with your friend so they actually check correctly instead of just saying “yeah, looks fine” without really testing it properly.
Clear Your Browser Cache
Your browser cache is a software system that’s designed to make websites load faster by storing local copies of files so you don’t have to download them again. But when those cached files get corrupted or outdated, they can make a perfectly functional website appear broken.
This is one of the most common causes of “my site is down but only for me” problems. Fortunately, it’s a pretty easy to fix.
⚠️ Be warned! ⚠️ This will log you out of websites and clear your browsing history. That’s normal. Maybe it’s worth it for you, maybe it’s not. I find it to be really frustrating.
Google Chrome Option 1:
This is more complicated, but it just clears one site. Do this first so you don’t have to clear everything.
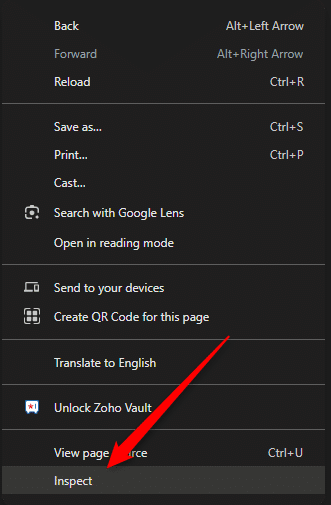
- Go the site in Chrome and right click and go to Inspect.
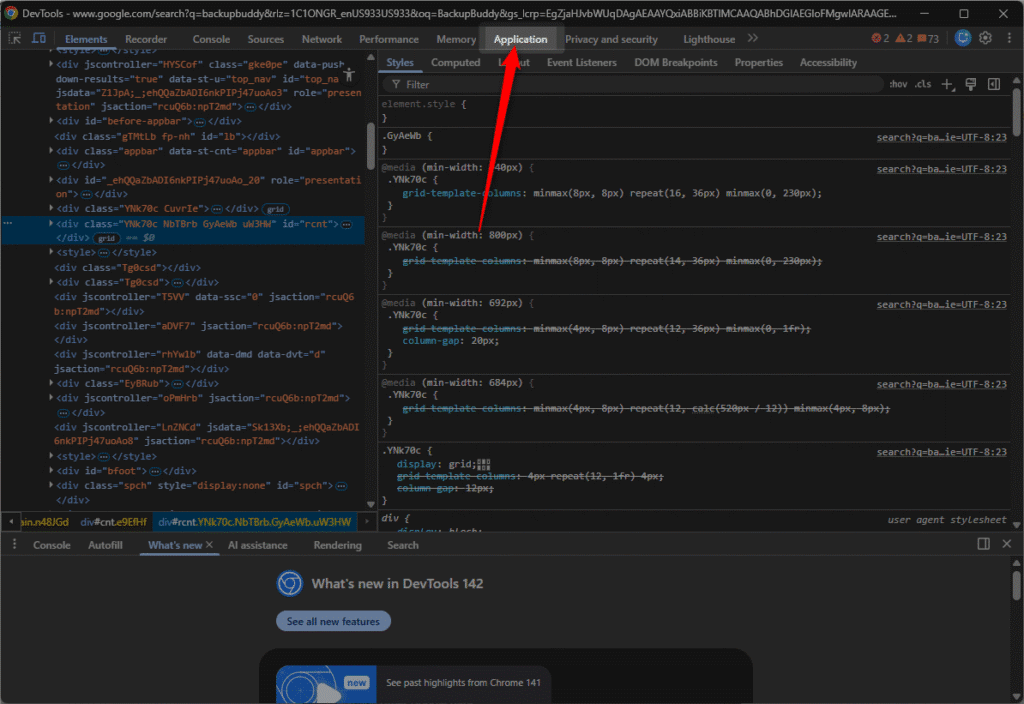
- You’ll the Inspector. Go to the Application tab.
- Click on “Clear Site Data”
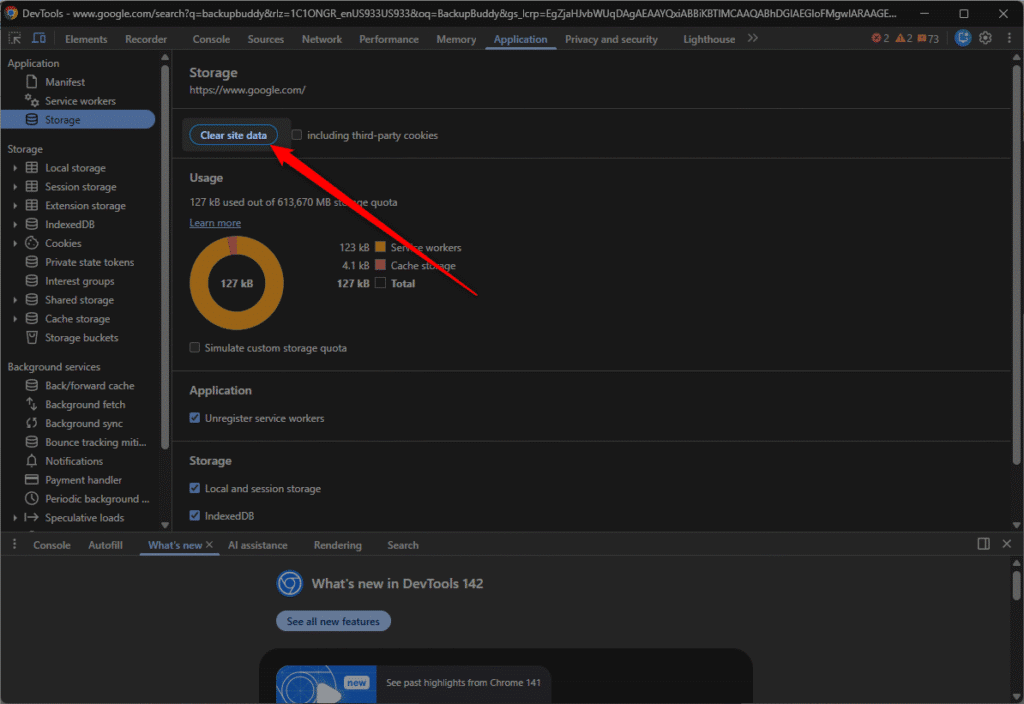
- Close the inspector and refresh the website and see if this fixes the problem
Google Chrome Option 2 – this clears EVERYTHING, so try it after the item above:
- Press Ctrl+Shift+Delete (Windows) or Cmd+Shift+Delete (Mac)
- Select “Cached images and files”
- Choose “All time” from the time range dropdown
- Click “Clear data”
- Refresh the website
It should look something like this:
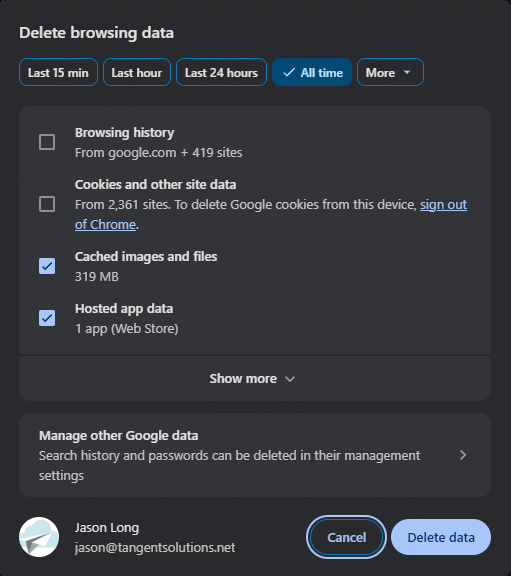
That’s it. Now try loading your site again.
Firefox:
- Press Ctrl+Shift+Delete (Windows) or Cmd+Shift+Delete (Mac)
- Check the box next to “Cache”
- Click “Clear Now”
Firefox should look something like this:

Safari (Mac):
- Go to Safari menu > Preferences
- Click the Advanced tab
- Check “Show Develop menu in menu bar”
- Now go to Develop > Empty Caches
I don’t have a Mac, so I can’t take a screenshot of this one for you.
Safari (iPhone/iPad):
- Open Settings > Safari
- Scroll down to “Clear History and Website Data”
- Tap it and confirm
I also don’t have an iPhone anymore, so I can’t take a screenshot of this one for you either.
B. Check Your Internet Connection
Okay, so maybe it’s not the website. Maybe it’s your internet. Let’s figure that out.
Test Other Websites
This is the simplest diagnostic test in the world, and yet people skip it all the time.
Open your browser and try to visit:
If none of those load either, congratulations! Your website isn’t down. Your internet is.
Could be your Router: So, restart your router. And I mean actually restart it:
- Unplug the power cable
- Wait 30 seconds (seriously, wait the full 30 seconds)
- Plug it back in
- Wait a couple minutes for it to fully boot up
- Try again
I know it sounds like tech support cliché advice, but there’s a reason they all start with this stuff.
If restarting your router doesn’t get your internet back online, the problem is with your internet service provider. Call them. That’s outside the scope of this guide because it has nothing to do with your website, and it would probably be the most frustrating guide in the world to write.
Check Your WiFi Connection
Look at the WiFi icon on your device. Do you have a connection?
- Are you connected to a network?
- Is the signal strong, or is it showing one bar?
- Are you signed into your network?
- Are you accidentally connected to a neighbor’s network that requires a password?
Sometimes the answer is embarrassingly simple. I once spent 10 minutes troubleshooting a client’s “website emergency” before realizing they’d walked to a coffee shop and never connected to the WiFi.
Try a Different Device
Computer not loading the site? Try your phone.
Phone not working? Try a tablet.
Tablet having issues? Try someone else’s laptop.
Oh, and whatever you do, don’t forget the most important one. Shut down your computer, unplug it for 2 minutes, plug it back in, and reboot it. After all these years, sometimes that still works.
Nothing works – no sites load, no internet connection, whatsoever? That’s actually useful information. It means the problem is almost certainly your internet connection, and fortunately not your website.
What You’ve Learned So Far
At this point, you should know one of three things:
1. The site is down for everyone (or just you): The third-party tools confirmed it, your phone on cellular data can’t access it, and your friend in another city can’t load it either. You have a real problem and need to keep going with this guide.
2. The site is up, but you can’t access it: The site loads for others and on third-party checkers, but not for you. This is a local issue. It’s your browser, your cache, or your network. Jump to Section III.E for browser-specific fixes, or continue reading if clearing your cache didn’t work.
3. Your internet is down: Other sites won’t load either. Call your internet service provider. Your website is fine.
Here’s the thing: Knowing which category you’re in changes everything about how you proceed. Don’t skip this diagnostic phase. I’ve seen people waste entire weekends trying to fix a site that was never broken.
Now let’s move on to the website support and maintenance you can do yourself and there are more of them than you might think.
III. Issues You Can Fix Right Now
Alright, so you’ve confirmed your site is actually down, or at least, it’s not loading properly for you or your visitors. Now what?
Here’s the good news: A lot of common website problems can be fixed in minutes without any technical expertise. You don’t need to be a developer. You don’t need to understand server architecture. You just need to follow the steps.
Over my career, I’ve tracked the most common causes of website downtime, and I’m going to walk you through them in order of likelihood. We’ll start with the #1 culprit, the thing that causes more “emergencies” than anything else.
Let’s take a look at what you can actually fix yourself.
A. Domain Problems (The Usual Suspect)
Why domains cause problems: Your domain is like your website’s street address. If the address expires or points to the wrong place, nobody can find your site. It doesn’t matter if your website files are perfect and your hosting is working flawlessly, if the domain isn’t working, your site is effectively invisible.
I’ve seen million-dollar businesses go offline because someone forgot to renew a $12 domain. It’s embarrassing, it’s preventable, and it happens all the time.
1. Expired Domain Registration (30% of All Downtime Cases)
This is it. The single most common reason websites go down.
What happened: You forgot to renew your domain, or your payment failed. Your domain registrar tried to charge your credit card, it didn’t go through, and after a grace period, they suspended your domain.
It’s not malicious. It’s not complicated. You just… forgot. Or your card expired. Or you changed email addresses and never saw the renewal reminders.
How to Check:
Method 1: Who.is Lookup
This is the fastest way to check if your domain has expired:
- Go to Who.is
- Enter your domain name (example: supportmy.website)
- Look for “Registry Expiry Date” or “Expiration Date”
- Check the date
Red flag: If the date is in the past, your domain has expired. That’s your problem right there.
The Who.is lookup pulls data directly from the domain registry, so it’s accurate and doesn’t require you to log into anything.
Method 2: Your Domain Registrar Account
If you know where you registered your domain, log in directly:
Common registrars include:
- GoDaddy
- Namecheap
- Google Domains
- Hover
- Network Solutions
- Domain.com
Here’s what to do:
- Log into your registrar account
- Navigate to “My Domains” or “Domain Management”
- Look for your domain in the list
- Check for “Expired,” “Renewal Required,” or red warning labels
The interface looks different at each registrar, but they all make expired domains pretty obvious, usually with red banners or warning icons.
Can’t remember where you registered your domain? Check your old emails or credit card statements for charges from domain companies. Or use the Who.is lookup, it’ll tell you which registrar manages your domain.
Method 3: Check Your Email
Domain registrars send multiple reminder emails before expiration:
- Search your inbox for emails from your domain registrar
- Use keywords like: “domain expiration,” “renewal,” “expired,” “action required”
- They typically send reminders at 30 days, 15 days, and 7 days before expiration
Check your spam folder too. I’ve seen plenty of cases where renewal reminders got filtered as spam, and the domain owner never saw them.
How to Fix:
Okay, your domain expired. Don’t panic. Most registrars give you a grace period to fix this without losing your domain permanently.
Step 1: Log into your domain registrar account
Go to the registrar’s website and log in. Can’t remember your password? Click “Forgot Password” they’ll send you a reset link.
Can’t remember which registrar you used? The Who.is lookup will tell you. Look for “Registrar” in the results.
Step 2: Find the expired domain
Once you’re logged in, navigate to your domain list. The expired domain will usually have a red banner or “Action Required” notice next to it. Hard to miss.
Step 3: Click “Renew” or “Reactivate”
There should be a button or link to renew the domain. Click it.
Here’s what you need to know about timing:
- Grace Period (0-30 days after expiration): You can renew at the normal price, usually $10-15 per year
- Redemption Period (30-60 days after expiration): The registrar has released your domain, and getting it back costs significantly more, typically $100-200 extra
- After 60+ days: Your domain might be released to the public and someone else could buy it
The bottom line is: The sooner you fix this, the cheaper it is.
Step 4: Complete payment
Enter your credit card information and complete the payment. Make sure the transaction actually goes through, check for a confirmation screen or email.
Step 5: Verify renewal
After payment:
- Refresh your domain management page
- Check that the new expiration date shows (should be 1+ years from today)
- Look for a confirmation email from the registrar
Step 6: Wait (if you were in the grace period)
Once you’ve renewed, your site should come back up within 1-4 hours. This is because DNS (the internet’s address book) needs time to update globally.
You can’t speed this up. Just wait. Go get coffee. Check back in an hour.
If you were in the redemption period, it might take up to 24-48 hours.
How to Prevent This From Ever Happening Again:
Look, I’ve been doing this for 25+ years, and I’m going to tell you something important: Enable auto-renewal RIGHT NOW.
Seriously. Stop reading this article, go enable auto-renewal, then come back.
Here’s how:
Enable Auto-Renewal (DO THIS NOW!):
- Log into your domain registrar account
- Go to Domain Management
- Find your domain
- Look for “Auto-Renewal” or “Auto-Renew” setting
- Turn it ON
- Verify which credit card will be charged
Every major registrar has this feature. Use it. There is literally no good reason to manage domain renewals manually.
Update Payment Method:
Even with auto-renewal enabled, you need to keep your payment information current:
- Set a calendar reminder to check your payment method every 6 months
- Update your credit card info before the card expires
- Consider using a credit card that doesn’t expire for several years
Add to Password Manager:
Use a password manager (LastPass, 1Password, Bitwarden) to store:
- Your domain registrar login credentials
- Your domain expiration dates
- Notes about which domains you own and where
Set reminders 60 days before expiration as a backup, even with auto-renewal enabled.
Time to Fix: 10-15 minutes (plus 1-4 hours for DNS to update)
Cost: $10-50 for normal renewal, $100-200 if you’re in the redemption period
2. Recent Domain/DNS Changes (20% of Cases)
What happened: You recently changed hosting companies, updated nameservers, or modified DNS settings, and the internet is still catching up.
This is different from an expired domain. Your domain is active and paid for, it’s just pointing to the wrong place, or the change you made is still propagating across the internet.
Common scenarios:
- Just moved to a new hosting company
- Changed nameservers
- Updated A records or CNAME records
- Just added Cloudflare or another CDN
- Migrated from one server to another
Understanding DNS Propagation:
Here’s the simple explanation: When you change where your domain points, that information has to spread to thousands of DNS servers worldwide. It’s like updating your address with the post office, it doesn’t happen instantly everywhere at once.
How long it takes: Usually 24-48 hours, sometimes up to 72 hours
Why it varies: Different internet service providers update their DNS caches at different speeds. Some update every few hours, others wait 24-48 hours.
The frustrating part: During propagation, your site might work in some locations but not others. Your friend in California can see it, but you can’t. Or it works on your phone but not your computer. This is completely normal and expected.
How to Check:
Method 1: WhatsMyDNS.net
This tool checks your DNS from multiple locations worldwide:
- Go to WhatsMyDNS.net
- Enter your domain name
- Leave record type as “A” (or choose your specific record type)
- Click “Search”
You’ll see a map with checkmarks and X’s showing where your DNS has updated:
- Green checkmarks = DNS is updated in that location
- Red X’s or different IP addresses = Still propagating
- Mix of both = Changes are in progress (this is normal!)
If you see a mix of results, your DNS changes are propagating. Just wait.
Method 2: DNSChecker.org
Similar to WhatsMyDNS but shows more locations:
- Go to DNSChecker.org
- Enter your domain
- Select record type
- Click “Search”
This gives you even more granular data about where your DNS has propagated and where it hasn’t.
What to Do:
If you made changes in the last 24 hours:
Just wait. Seriously. There’s nothing you can do to speed this up.
Check back every few hours to see progress on WhatsMyDNS. Watch the green checkmarks spread across the map. It’s actually kind of satisfying.
This is NORMAL and EXPECTED. Don’t panic. Don’t make more changes. Don’t call your hosting company demanding they “fix” it. You’ll just look foolish.
If you made changes 48+ hours ago and it’s still not working:
Now we might have a problem. Double-check your DNS settings:
- Log into your hosting control panel
- Find your DNS settings or nameserver information
- Verify the nameservers or A records match exactly what your hosting company provided
- Look for typos, this is the most common mistake
One misplaced character in a DNS record can break everything.
If you’re not sure what you changed:
Check your email for confirmations from hosting or domain companies. Look for anything mentioning:
- “Nameservers”
- “DNS”
- “Migration”
- “Transfer”
If you still can’t figure it out, contact your new hosting company. They can verify your DNS settings are correct and troubleshoot from their end.
Quick Check: Did You Change Nameservers?
Nameservers are the most common DNS change people make. Here’s how to verify they’re correct:
- Log into your domain registrar
- Go to your domain management page
- Look for “Nameservers” or “DNS Settings”
- Check what’s currently listed
They should match exactly what your hosting company provided. Common formats look like:
- ns1.yourhostingcompany.com
- ns2.yourhostingcompany.com
Or:
- ns1.bluehost.com / ns2.bluehost.com
- ns1.siteground.net / ns2.siteground.net
If they don’t match what your hosting company gave you, that’s your problem. Update them to the correct values.
Time to Fix: 24-48 hours (automatic, just wait!)
Cost: Free
During the waiting period:
- Your site might work in some places but not others, this is completely normal
- Don’t make more changes, you’ll reset the propagation clock
- Be patient (I know, easier said than done)
B. Hosting Account Issues
Why hosting causes downtime: Your hosting is where your website files actually live. If there’s a problem with your hosting account or the server itself, your site can’t be displayed to visitors.
Think of hosting like renting an apartment for your website. If you don’t pay rent, you get evicted. If the building has problems, your apartment is affected.
1. Billing Problem/Suspended Account (25% of Cases)
Hate to break it to you, but this is almost as common as expired domains.
What happened: Your hosting payment failed, your credit card expired, or your account simply wasn’t paid. The hosting company sent you warnings, you didn’t see them or forgot to act, and they suspended your account.
How to Check:
Step 1: Check Your Email
Search your inbox for emails from your hosting company. Use these keywords:
- “suspended”
- “payment”
- “billing”
- “overdue”
- “action required”
Typical subject lines look like:
- “Account Suspended – Action Required”
- “Payment Failed for [Your Domain]”
- “Your hosting payment is overdue”
- “Final Notice: Hosting Account Will Be Suspended”
Check your spam folder! I cannot stress this enough. Hosting billing emails frequently end up in spam, and people miss them entirely.
Step 2: Try to Log Into Your Hosting Account
Common hosting companies include:
- Bluehost
- HostGator
- SiteGround
- WP Engine
- GoDaddy
- DreamHost
- A2 Hosting
- InMotion
Go to your hosting company’s website, click “Login” or “Client Login,” and enter your credentials.
What you’ll see if your account is suspended:
- A red or orange banner at the top of the dashboard
- “Account Suspended” message
- Billing notification demanding payment
- Limited access to features
It’ll be pretty obvious.
Step 3: Look at Your Billing Dashboard
Navigate to: Billing > Invoices or Billing > Account Status
Look for:
- Unpaid invoices (usually highlighted in red)
- “Past Due” status
- Payment failure messages
- Outstanding balance amount
Why This Happens:
Let me count the ways:
- Credit card expired
- Credit card was declined (hit the limit, fraud alert triggered, insufficient funds)
- Auto-pay didn’t work for some reason
- You forgot to pay a manual invoice
- Your email address changed and you missed all the notifications
- The payment email went to spam and you never saw it
It happens. More than anything, it happens to busy people who have a thousand things on their plate. I get it.
How to Fix:
Step 1: Update Your Payment Method
- In your hosting account, go to: Billing > Payment Methods
- Click “Add Payment Method” or “Update Card”
- Enter your new credit card information
- Click “Save” or “Make Default”
Make sure you’re actually setting it as the default payment method. Some systems let you store multiple cards, and you need to specify which one to use.
Step 2: Pay the Outstanding Balance
- Go to Billing > Invoices
- Find the unpaid invoice (it’ll be marked clearly)
- Click on it
- Click “Pay Now”
- Select your payment method
- Complete the payment
- Save your receipt or confirmation number
Don’t just update your payment method and assume it’ll auto-charge. Some hosts require you to manually pay past-due invoices even after updating your card.
Step 3: Request Unsuspension
Here’s where hosting companies differ:
Some hosts unsuspend automatically within 1 hour of payment. You don’t need to do anything, just wait.
Others require you to contact support to manually unsuspend your account.
If your account isn’t automatically unsuspended within an hour:
- Look for a “Chat” or “Support” button in your hosting dashboard
- Open a support ticket
- Say: “I just paid invoice #[number], please unsuspend my account”
- Provide your invoice or payment confirmation number
They usually unsuspend accounts within 5-30 minutes during business hours.
Step 4: Verify Your Site is Back Up
- Wait 5-30 minutes after unsuspension
- Clear your browser cache (Ctrl+Shift+R or Cmd+Shift+R)
- Visit your website
- Test multiple pages to make sure everything works
Preventing Future Suspensions:
Look, let’s make sure this never happens again.
Enable Auto-Pay:
- In your hosting account, go to: Billing > Auto-Pay Settings or Billing > Payment Settings
- Turn it ON
- Verify which card will be charged
- Make sure the card won’t expire soon
Set Up a Backup Payment Method:
Some hosts let you add a secondary payment method. If the first card fails, they’ll automatically try the backup. Use this feature if available.
Update Card Expiration Dates Proactively:
Set a calendar reminder for 1 month before your credit card expires. Update it in your hosting account before expiration, not after.
Whitelist Hosting Emails:
Add your hosting company’s billing email address (usually billing@[hostingcompany].com) to your contacts. This helps prevent their emails from going to spam.
Set Calendar Reminders:
If you prefer to pay manually (though I don’t recommend it), set a calendar reminder for 5 days before your hosting bill is due. Give yourself a buffer.
Time to Fix: 5-30 minutes (plus payment processing time)
Cost: Whatever your hosting bill is, usually $5-50/month for most small business sites
2. Exceeded Hosting Resources (15% of Cases)
What happened: Your website used too much CPU, RAM, or bandwidth, and your hosting company temporarily shut it down or throttled it to protect their servers.
This is especially common if you’re on shared hosting, where you’re sharing server resources with dozens or hundreds of other websites.
What are “resources”?
Let me break this down in plain English:
CPU (Processing Power): Think of this like your computer’s brain. Every time someone visits your site, the server has to “think” to generate the page. Complex operations require more CPU.
RAM/Memory: Short-term memory for running processes. When your site is actively being used, it needs RAM to function.
Bandwidth: The amount of data transferred between your server and visitors. Every image, video, and page view uses bandwidth.
Disk Space: Storage space for your website files, images, databases, emails, backups, etc.
Inodes: The number of individual files on your account (this is a Linux thing). Every file counts as one inode.
Why you might hit limits:
- Traffic spike: Your post went viral, got mentioned on social media, or was featured somewhere
- Inefficient plugins or code: Poorly coded plugins that make excessive database queries
- Being attacked: Malicious bots hammering your site
- Large files: Videos or PDFs being downloaded repeatedly
- Shared hosting with low limits: You’ve outgrown your hosting plan
I’ve seen this hundreds of times. A client’s site is humming along fine, then suddenly they get featured on a major blog, traffic spikes 10x, and boom, the hosting company shuts them down for “resource abuse.”
How to Check:
Step 1: Log Into Your Hosting Control Panel
This is usually cPanel, Plesk, or a custom dashboard depending on your host.
Step 2: Find Resource Usage
In cPanel:
- Look for “CPU and Concurrent Connection Usage” widget on the main dashboard page
- Or go to: Advanced > CPU Usage
- Or: Metrics > Resource Usage
In Plesk:
- Go to Statistics
- Look at the Resources tab
In custom dashboards:
- Look for sections labeled “Usage,” “Resources,” “Statistics,” or “Performance”
Step 3: Check for Warnings
What you’re looking for:
- Red or orange bars = You’re hitting or exceeding your limits
- Email notifications about resource usage
- Error messages in your hosting dashboard
- Percentage indicators showing 90%+ usage
Step 4: Look at Error Logs (If Available)
In cPanel: Metrics > Errors
Look for messages like:
- “Resource Limit Is Reached”
- “LVE limits exceeded”
- “Entry Processes limit reached”
Common error codes your visitors might see:
- 508 Resource Limit Reached
- 503 Service Unavailable
- 429 Too Many Requests
Common Limit Types:
Let me explain what these actually mean:
Entry Processes (EP): The number of simultaneous PHP processes (basically, how many people can actively use your site at the same time)
- Typical shared hosting limit: 20
- What triggers it: 20+ people loading pages simultaneously
Physical Memory (PMEM): RAM usage per account
- Typical shared hosting limit: 1-2GB
- What triggers it: Memory-intensive plugins, large unoptimized images, inefficient code
CPU Usage: Processing power, usually measured as a percentage
- Typical shared hosting limit: Varies widely
- What triggers it: Complex database queries, inefficient code, too many simultaneous visitors
I/O (Input/Output): Disk read/write speed, measured in MB/s
- Typical shared hosting limit: 1-5 MB/s
- What triggers it: Too many file operations, constant database writes
How to Fix:
Quick Fix (Temporary):
Wait for the Reset
Most shared hosts reset resource limits automatically:
- Every 5-15 minutes
- Every hour
- Every 24 hours
Check your hosting documentation or ask support what their reset interval is.
Your site should come back online automatically when the counter resets. If it does, great, but this is just a warning. You need a permanent solution or it’ll happen again.
Permanent Fixes:
Option 1: Upgrade Your Hosting Plan (Most Common Solution)
This is usually the right answer if you’re consistently hitting limits.
- Log into your hosting account
- Go to: Billing > Upgrade or Services > Upgrade
- Choose the next tier up
- Review the new resource limits
- Process the payment
- Wait 1-4 hours for the upgrade to take effect
Cost: Usually $10-30/month more, depending on your current plan
This is the cleanest solution. You get more resources, your site stays fast, and you don’t have to worry about hitting limits constantly.
Option 2: Optimize Your Website (If Upgrading Isn’t an Option Right Now)
If you can’t upgrade immediately, you can buy yourself some time by optimizing:
Install a caching plugin:
- WP Super Cache (free)
- W3 Total Cache (free)
- WP Rocket (paid, $49/year – worth it)
Caching dramatically reduces server resource usage by serving pre-generated pages instead of building them from scratch every time.
Optimize images:
- Use Smush or ShortPixel plugins
- Compress large images before uploading
- Convert images to WebP format
Large, unoptimized images are resource hogs.
Deactivate unused plugins:
Every active plugin uses resources. Go through your plugin list and deactivate anything you’re not actually using.
Choose a lighter theme:
Some WordPress themes are bloated with features you don’t need. Consider switching to a faster, lighter theme.
Important note: These are bandaids. If you’re consistently hitting resource limits, you need better hosting. Optimization helps, but it’s not a long-term solution.
Option 3: Check for Malicious Traffic
If you had a sudden, unexpected spike, you might be under attack:
- Install Wordfence or Sucuri security plugin
- Run a security scan
- Check for suspicious login attempts
- Look at your traffic logs for bot patterns
- Block suspicious IP addresses
If you’re being attacked, contact your hosting support immediately. They can help block malicious traffic at the server level.
Preventing Future Issues:
Monitor Your Resources:
Check your resource usage weekly via your hosting dashboard. If you’re consistently over 70% on any metric, start planning to upgrade. Don’t wait until you hit 100% and your site goes down.
Use a CDN (Content Delivery Network):
Services like Cloudflare (free option available) serve your images and static files from servers around the world, reducing the load on your hosting server.
Regular Maintenance:
- Keep WordPress, plugins, and themes updated
- Remove unused plugins completely (don’t just deactivate)
- Optimize images before uploading them
- Clear your cache periodically
Consider Managed WordPress Hosting:
If your site is growing and important to your business, consider hosts like:
- WP Engine
- Kinsta
- Flywheel
- Pagely
They’re more expensive ($25-100+/month), but they handle resources better, include automatic backups, better security, and actually support WordPress specifically.
Time to Fix:
- Automatic reset: 5 minutes to 24 hours (no action needed)
- Upgrade plan: 10 minutes to apply, 1-4 hours to take effect
- Optimization: 30-60 minutes
Cost:
- Free (if temporary and you just wait)
- $10-50/month more (upgrading your plan)
- $49/year (premium optimization plugins like WP Rocket)
C. WordPress-Specific Quick Fixes
Note: These only apply if you’re using WordPress. If you use Wix, Squarespace, Shopify, or another platform, skip this section.
1. Plugin or Theme Causing Crash (10% of Cases)
What happened: You recently updated or installed a plugin or theme, and it broke your site. Or two plugins are conflicting with each other. Or your theme is incompatible with a plugin.
This is incredibly common, and it’s one of the most frustrating issues because it often happens right after you update something that was working fine.
Common scenarios:
- Updated WordPress core, a plugin, or your theme
- Installed a new plugin
- Two plugins conflicting with each other
- Theme conflicts with a plugin
- PHP version incompatibility (your host updated PHP, and old code broke)
Warning signs before the crash:
- Site was noticeably slower
- Seeing error messages in your admin area
- Strange behavior after an update
- White screen or partial page loading
- Admin area sluggish or unresponsive
What you’ll see when this happens:
- White Screen of Death (WSoD): Completely blank white page
- “There has been a critical error on this website”
- “The site is experiencing technical difficulties”
- Partial page loading: Header loads, but content doesn’t
- Error messages about PHP, memory, or fatal errors
How to Fix (Method 1: Via File Manager – Easier):
You don’t need to know how to code for this. Just follow the steps.
Step 1: Access Your Hosting File Manager
- Log into your hosting control panel (usually cPanel)
- Find the “File Manager” icon (usually under a “Files” section)
- Click to open it
Step 2: Navigate to Your WordPress Directory
Your WordPress files are usually in one of these folders:
- public_html/
- www/
- yourdomain.com/
- httpdocs/
Look for the WordPress folders: wp-admin, wp-content, wp-includes. That’s how you know you’re in the right place.
Step 3: Locate the Plugins Folder
- Click on the wp-content folder
- Click on the plugins folder
- You’ll see all your plugin folders listed
Step 4: Rename the Plugins Folder
This is the key step:
- Right-click on the “plugins” folder
- Select “Rename”
- Change the name to: plugins-disabled or plugins-old
- Click “Rename” or press Enter
What this does: WordPress looks for a folder called “plugins.” When it can’t find it, it automatically deactivates all plugins. Your site should load without them.
Step 5: Check If Your Site Works Now
- Open a new browser tab
- Visit your website
- Clear your cache first (Ctrl+Shift+R or Cmd+Shift+R)
If your site loads now: Plugins were the problem. Continue to Step 6.
If your site still doesn’t load: The problem is likely your theme. Skip to Step 8.
Step 6: Rename the Folder Back
- Go back to File Manager
- Rename “plugins-disabled” back to plugins
Step 7: Find the Problem Plugin
Now we play detective:
- Go to your website/wp-admin
- Log in to WordPress
- Go to Plugins > Installed Plugins
- All plugins will be deactivated (this is normal)
- Activate them one at a time
- After each activation, check if your site still works
- Open your site in another tab and refresh after each plugin activation
When you activate a plugin and your site breaks again, you’ve found the culprit.
When you find the problem plugin:
- Don’t activate it again
- Delete it
- Look for an alternative plugin that does the same thing
- Check the plugin’s support forums to see if others are reporting issues
- See if there’s a newer version that fixes the problem
Step 8: Disable Your Theme (If Plugins Weren’t the Problem)
If your site still didn’t load after disabling plugins, the theme is likely the issue:
- In File Manager, go to: wp-content/themes
- Find your active theme folder (you’ll need to know which theme you’re using)
- Right-click and rename it (add -disabled to the end)
- WordPress will automatically switch to a default theme (Twenty Twenty-One or similar)
- Check if your site loads now
If yes: Your theme was the problem. You’ll need to either fix the theme, update it, or switch to a different theme.
How to Fix (Method 2: Via FTP For Advanced Users):
If you’re comfortable with FTP clients, this method gives you more control:
Step 1: Download an FTP Client
- FileZilla (free), recommended for beginners
- Cyberduck (free, Mac-friendly)
- WinSCP (free, Windows)
Step 2: Get Your FTP Credentials
In cPanel: Files > FTP Accounts
Or check your hosting welcome email when you first signed up.
You need:
- FTP Host (usually your domain or server IP address)
- Username
- Password
- Port (usually 21)
Step 3: Connect
- Enter your credentials in the FTP client
- Click “Connect” or “Quickconnect”
- You should see your server files on the right side
Step 4: Navigate to Plugins
Find: public_html/wp-content/plugins
Step 5: Rename the Plugins Folder
- Right-click the plugins folder
- Choose “Rename”
- Rename to “plugins-disabled”
Step 6: Follow the Same Steps as the File Manager Method
Test your site, rename the folder back, activate plugins one by one to find the culprit.
Prevention Tips:
Here’s how to avoid this nightmare in the future:
Backup Before Updates:
Use a backup plugin like:
- UpdraftPlus (free)
- BackupBuddy (paid)
- BlogVault (paid)
Create a full backup right before updating anything. Store the backup somewhere safe like Dropbox or Google Drive.
Update One at a Time:
Don’t bulk update everything at once. Update one plugin, check your site, then update the next one. This way, if something breaks, you know exactly which update caused it.
Check Compatibility First:
Before updating:
- Read the plugin’s changelog
- Check recent reviews for reports of issues
- Make sure it’s compatible with your WordPress version
- Look for warnings about PHP version requirements
Use a Staging Site:
Many hosts offer staging environments where you can test updates before pushing them to your live site. Use this feature if you have it.
Keep Your Plugin Count Low:
More plugins = more potential conflicts. Regularly audit your plugins and remove anything you’re not actively using.
Time to Fix: 10-20 minutes
Cost: Free
Difficulty: Moderate (but I just walked you through it step-by-step)
2. Clear WordPress Cache (5% of Cases)
What happened: Your caching plugin is showing old, broken content or preventing updates from displaying properly.
What is cache?
Cache is temporary storage of your website pages. It makes your site load faster by serving pre-built pages instead of generating them from scratch every time. But sometimes it shows outdated or broken versions.
Signs you need to clear cache:
- Made changes to your site but don’t see them
- Site looks broken after an update
- Old content still showing even though you updated it
- Mix of old and new content appearing on different pages
- CSS or styling looks wrong after making changes
How to Fix:
Method 1: Via WordPress Admin (Easiest)
The exact steps depend on which caching plugin you’re using:
If using WP Super Cache:
- Log in to WordPress admin
- Go to Settings > WP Super Cache
- Click the “Delete Cache” button
- Wait for the confirmation message
If using W3 Total Cache:
- Look at the WordPress admin top bar
- Find the “Performance” menu
- Hover over it
- Click “Purge All Caches”
- You’ll see a confirmation message
If using WP Rocket:
- Look at the WordPress admin top bar
- Find the “WP Rocket” menu
- Click “Clear Cache”
Or:
- Go to Settings > WP Rocket
- Click the “Clear Cache” button
If using LiteSpeed Cache:
- Look at the WordPress admin top bar
- Find the “LiteSpeed Cache” menu
- Click “Purge All”
- Confirmation message will appear
Method 2: Via Hosting Control Panel
Many hosts have server-level caching that’s separate from WordPress plugins:
SiteGround:
- Log into your SiteGround dashboard
- Go to Speed > Caching
- Click “Flush Cache” for each caching type listed
Bluehost:
- Log into cPanel
- Go to Performance > Caching
- Click “Clear Cache” or “Purge Cache”
WP Engine:
- Log into WP Engine Portal
- Find your site
- Click “Purge all caches”
Method 3: Via Plugin Settings Page
If you can’t find the quick buttons:
- Go to WordPress admin
- Go to Plugins
- Find your caching plugin
- Click “Settings”
- Look for “Clear,” “Purge,” “Flush,” or “Delete” cache options
- Usually there’s a big button, click it
After Clearing Cache:
Step 1: Clear Your Browser Cache Too
Press Ctrl+Shift+R (Windows) or Cmd+Shift+R (Mac) to do a hard refresh.
Or follow the browser cache clearing steps from Section II.A.4.
Step 2: Check Your Site
- Visit your website
- Check if your changes now show
- Test multiple pages
- Test on different devices
Step 3: If Still Not Working
- Try clearing the cache again
- Wait 5 minutes and check again
- Check if you’re using a CDN (like Cloudflare) and clear that cache too (we’ll cover this next)
Prevention:
Most caching plugins have settings to automatically clear cache when you update content. Verify this is enabled:
In your caching plugin settings, look for options like:
- “Auto-purge on update”
- “Clear cache when content is published”
- “Automatic cache clearing”
Make sure these are turned ON.
Time to Fix: 2-5 minutes
Cost: Free
Difficulty: Easy
D. Simple CDN/Caching Issues
What is a CDN? A Content Delivery Network is a service (like Cloudflare) that speeds up your site by copying it to servers worldwide. When someone visits your site, they get the content from the server closest to them.
It’s great for performance, but it adds another layer of caching that can cause issues.
1. Cloudflare or CDN Cache Problems
What happened: Your CDN is showing an old, broken version of your site to visitors.
Common scenarios:
- Just updated your site but changes don’t show
- Made fixes but visitors still see errors
- Site works when you bypass the CDN but not normally
- Getting 520, 521, 522, or 523 errors from Cloudflare
How to Check If You’re Using a CDN:
Do you remember setting up Cloudflare or a similar service? If you’re not sure:
- Log into your domain registrar
- Check your nameservers
- If they include “cloudflare.com” in the name, you’re using Cloudflare
How to Fix (Cloudflare):
Step 1: Log Into Cloudflare
- Go to Cloudflare.com
- Click “Log In”
- Enter your credentials
- You’ll see your domain(s) listed on the dashboard
Step 2: Select Your Domain
Click on your domain name. This opens the domain overview page.
Step 3: Purge Cache
Option A: Purge Everything (Easiest)
- Click “Caching” in the left sidebar
- Look for the “Purge Cache” section
- Click the “Purge Everything” button
- Confirm when asked
- Wait 30 seconds
Option B: Custom Purge (For Specific Pages)
If you only want to clear cache for specific pages:
- Click “Caching” in the left sidebar
- Click “Purge Cache”
- Select “Custom Purge”
- Enter the specific URLs you want to clear
- Click “Purge”
Step 4: Verify
- Wait 2-5 minutes
- Clear your browser cache
- Visit your site
- Your changes should now appear
Cloudflare-Specific Error Codes:
If you’re seeing error codes from Cloudflare, here’s what they mean:
520 Error: Web server returns unknown error
- Solution: Check with your hosting company, there’s a problem on their end
- Temporarily pause Cloudflare (instructions below) to verify
521 Error: Web server is down
- Solution: Your hosting server is actually down
- Log into your hosting dashboard to check
- Contact hosting support
522 Error: Connection timed out
- Solution: Your server is taking too long to respond
- Check with hosting support
- May need to whitelist Cloudflare IP addresses
523 Error: Origin is unreachable
- Solution: Cloudflare can’t reach your server
- Check that your nameservers are correct
- Verify your hosting is online
Temporarily Disable Cloudflare (For Testing):
If you want to test whether Cloudflare is causing the problem:
- In your Cloudflare dashboard, click “Overview” in the sidebar
- Scroll down to “Advanced Actions”
- Toggle “Pause Cloudflare on Site”
- Wait 5 minutes
- Test your site
If your site works with Cloudflare paused, you know Cloudflare was the issue. Fix the problem, then turn Cloudflare back on.
For Other CDNs:
StackPath:
- Log into StackPath
- Go to Sites > [Your Site]
- Click “Purge”
- Select “Purge All Files”
KeyCDN:
- Log into KeyCDN Dashboard
- Go to Zones
- Click the “Purge” icon next to your zone
- Confirm
BunnyCDN:
- Log into BunnyCDN Dashboard
- Go to Pull Zones
- Find your zone
- Click “Purge Cache”
General CDN Cache Clearing:
If you don’t remember which CDN you’re using:
- Check your old emails for setup confirmations
- Check your WordPress plugins (some include built-in CDN features)
- Ask your hosting company, they’ll know
Time to Fix: 5-10 minutes
Cost: Free
Difficulty: Easy
E. Browser/Local Issues
What happened: The problem is on your computer or in your browser, not with your actual website.
This is the situation where your site is actually working fine for everyone else, but you can’t see it. It’s frustrating because it feels like your site is broken, but really it’s just your local setup causing problems.
We already covered clearing your browser cache back in Section II.A, but there are a few other browser and local computer issues that can make your site appear down when it’s not.
1. Your Computer’s DNS Cache
What it is: Your computer stores DNS information locally to speed up browsing. Sometimes this cached information gets outdated or corrupted, and your computer keeps trying to connect to the wrong server.
Signs this is your problem:
- Site works on your phone (with cellular data) but not your computer
- Site works for everyone else but not for you
- You recently changed hosting or DNS settings
- Other websites work fine, just yours doesn’t
How to Fix:
Windows:
- Click the Start button
- Type “cmd” in the search box
- Right-click “Command Prompt”
- Select “Run as administrator”
- Type this command exactly: ipconfig /flushdns
- Press Enter
- You should see: “Successfully flushed the DNS Resolver Cache”
- Close the command prompt
- Restart your browser
- Try visiting your site again
Mac:
The command varies depending on your macOS version, but this works for most recent versions:
- Open Terminal (Applications > Utilities > Terminal)
- Type this command: sudo dscacheutil -flushcache; sudo killall -HUP mDNSResponder
- Press Enter
- Enter your Mac password when prompted (you won’t see it as you type, this is normal)
- Press Enter again
- Close Terminal
- Restart your browser
- Try visiting your site again
For older Macs:
If that doesn’t work, try this simpler command:
sudo killall -HUP mDNSResponder
Linux:
The command depends on your distribution, but for most Ubuntu/Debian systems:
- Open Terminal
- Type: sudo systemd-resolve –flush-caches
- Or: sudo /etc/init.d/nscd restart
- Enter your password
- Restart your browser
After flushing DNS:
Wait a minute or two, then try accessing your site again. Clear your browser cache too (Ctrl+Shift+R or Cmd+Shift+R) just to be thorough.
2. Browser Extensions Causing Problems
What happened: A browser extension is blocking your site or interfering with how it loads.
Common culprits:
- Ad blockers (AdBlock, uBlock Origin)
- Privacy extensions (Privacy Badger, Ghostery)
- VPN extensions
- Security extensions
- Script blockers (NoScript)
How to Check:
Method 1: Try Incognito/Private Mode
This is the fastest test:
Chrome:
- Press Ctrl+Shift+N (Windows) or Cmd+Shift+N (Mac)
- Or: Click the three dots > New Incognito Window
Firefox:
- Press Ctrl+Shift+P (Windows) or Cmd+Shift+P (Mac)
- Or: Menu > New Private Window
Safari:
- Press Cmd+Shift+N
- Or: File > New Private Window
Edge:
- Press Ctrl+Shift+N
- Or: Click three dots > New InPrivate Window
Now try visiting your site in the private/incognito window.
If your site loads in incognito mode but not in regular mode: A browser extension is the problem.
Method 2: Disable Extensions One by One
If incognito mode confirmed it’s an extension issue:
Chrome:
- Click the three dots in the top-right corner
- Go to More Tools > Extensions
- You’ll see all your installed extensions
- Toggle them OFF one at a time
- After disabling each one, try loading your site
- When your site works, you’ve found the problematic extension
Firefox:
- Click the three lines (menu) in the top-right
- Click “Add-ons and themes”
- Click “Extensions” in the left sidebar
- Toggle extensions OFF one at a time
- Test your site after each one
Safari:
- Safari menu > Preferences
- Click “Extensions” tab
- Uncheck extensions one at a time
- Test your site after each one
Common solutions:
- If it’s an ad blocker: Whitelist your own domain in the extension settings
- If it’s a privacy extension: Add your domain to the allowed list
- If it’s a VPN: Try disconnecting temporarily to test
- If you don’t need the extension: Just remove it
3. Outdated Browser
What happened: Your browser is so old it can’t properly display modern websites.
This is less common now, but I still see it occasionally, especially with people using old work computers with locked-down IT policies.
How to Check:
Visit: https://www.whatismybrowser.com
This will tell you:
- Which browser you’re using
- What version it is
- Whether it’s outdated
How to Fix:
Chrome:
- Click the three dots
- Go to Help > About Google Chrome
- It will automatically check for updates and install them
- Restart Chrome when prompted
Firefox:
- Click the three lines (menu)
- Go to Help > About Firefox
- It will check for updates automatically
- Restart when prompted
Safari:
Safari updates come with macOS updates:
- Apple menu > System Preferences
- Click “Software Update”
- Install any available updates
Edge:
- Click the three dots
- Go to Help and feedback > About Microsoft Edge
- It will check and install updates
- Restart when prompted
4. Corrupted Browser Data
What happened: Your browser has corrupted data beyond just cache, cookies, site data, or settings that are causing problems.
How to Fix:
Chrome:
- Press Ctrl+Shift+Delete (Windows) or Cmd+Shift+Delete (Mac)
- Change time range to “All time”
- Check ALL boxes:
- Browsing history
- Cookies and other site data
- Cached images and files
- Autofill form data
- Site settings
- Click “Clear data”
- Restart Chrome
- Try your site again
Warning: This will log you out of all websites and clear your browsing history. That’s okay, it’s worth it to fix the problem.
Firefox:
- Press Ctrl+Shift+Delete (Windows) or Cmd+Shift+Delete (Mac)
- Change time range to “Everything”
- Check all boxes
- Click “Clear Now”
- Restart Firefox
Safari:
- Safari menu > Preferences
- Privacy tab
- Click “Manage Website Data”
- Click “Remove All”
- Confirm
- Also go to: Develop > Empty Caches (if you enabled the Develop menu)
- Restart Safari
If that doesn’t work, try a different browser entirely:
If your site works in a different browser, the problem is definitely browser-specific. You might need to:
- Reset your browser to default settings
- Reinstall the browser
- Or just use a different browser
5. Firewall or Antivirus Blocking Your Site
What happened: Your computer’s security software is blocking access to your website.
This can happen if:
- Your site was recently flagged (even incorrectly)
- You’re using aggressive security settings
- Your antivirus is overly cautious
How to Check:
- Temporarily disable your antivirus (just for testing)
- Try accessing your site
- If it works, your antivirus was blocking it
Common antivirus programs:
- Norton
- McAfee
- Avast
- AVG
- Kaspersky
- Windows Defender
How to Fix:
The exact steps vary by antivirus, but generally:
- Open your antivirus software
- Look for “Exceptions,” “Whitelist,” or “Allowed Sites”
- Add your domain to the allowed list
- Save the settings
- Re-enable your antivirus
- Try your site again
Windows Firewall:
If you’re using Windows Firewall:
- Control Panel > System and Security > Windows Defender Firewall
- Click “Allow an app or feature through Windows Defender Firewall”
- Look for your browser in the list
- Make sure both “Private” and “Public” are checked
- Click OK
Mac Firewall:
- System Preferences > Security & Privacy
- Click the Firewall tab
- Click “Firewall Options”
- Make sure your browser is allowed
- Click OK
6. Hosts File Blocking Your Site
What happened: Your computer’s hosts file is redirecting your domain to the wrong place.
This is rare unless you or someone else manually edited the hosts file (sometimes done by developers for testing).
How to Check and Fix:
Windows:
- Press Windows key + R
- Type: notepad C:\Windows\System32\drivers\etc\hosts
- Press Enter
- Look for any lines containing your domain name
- If you see your domain, put a # at the beginning of that line (this comments it out)
- Save the file (you may need administrator permission)
- Restart your browser
Mac:
- Open Terminal
- Type: sudo nano /etc/hosts
- Enter your password
- Look for any lines with your domain
- If found, put a # at the beginning of the line
- Press Ctrl+X to exit
- Press Y to save
- Press Enter to confirm
- Restart your browser
What you’re looking for:
Lines that look like:
127.0.0.1 yourdomain.com
Or:
192.168.1.100 yourdomain.com
If you see these and you didn’t intentionally add them, comment them out or delete them.
7. Try a Completely Different Network
What happened: Your entire network (home or office) has an issue, not just your device.
How to Test:
- Disconnect from WiFi
- Use your phone as a mobile hotspot
- Connect your computer to the hotspot
- Try accessing your site
Or:
- Take your laptop to a coffee shop
- Connect to their WiFi
- Try your site
If your site works on a different network: The problem is with your home/office internet or router, not your website.
How to Fix:
Restart your router:
- Unplug the power cable from your router
- Wait 30 seconds (seriously, count to 30)
- Plug it back in
- Wait 2-3 minutes for it to fully restart
- Reconnect your devices
- Try your site again
Reset router DNS settings:
Your router might be using DNS servers that have outdated information:
- Log into your router (usually by going to 192.168.1.1 or 192.168.0.1 in your browser)
- Find DNS settings (location varies by router)
- Change to public DNS servers:
- Google DNS: 8.8.8.8 and 8.8.4.4
- Cloudflare DNS: 1.1.1.1 and 1.0.0.1
- Save settings
- Restart router
- Try your site again
If you’re on a work or school network:
Your IT department might be blocking your site. Contact them, there’s nothing you can do on your end.
Is It Fixed?
At this point, you’ve worked through all the browser and local issues that could make your site appear down when it’s actually working fine.
If your site is now working: Great! You’ve solved the problem. Skip ahead to Section VI (Prevention) to make sure this doesn’t happen again.
If your site still isn’t working, and it’s confirmed down for everyone (not just you): You’ve eliminated all the simple fixes. It’s time to move to Section IV, where we’ll diagnose exactly which complex issue you’re dealing with, and whether you need professional help.
Here’s the thing: You’ve already done the smart thing by systematically working through the most common problems. If you’ve made it this far and your site is still down, the issue is likely more technical and may require expert assistance.
But don’t worry. In the next section, I’m going to give you a simple diagnostic decision tree that will tell you exactly what’s wrong and what to do about it.
The 10-Minute Diagnostic (for me)
The 10-minute diagnostic is what we use internally to diagnose problems. We have other tools and other systems to get to solutions faster, but this is basically it. Also, this is a 10-minute diagnostic for a professional. I can’t promise how long it’s going to take you to do it. But at least you have some steps now!
Before you get started, here’s a quick chart that goes through all the items:
Quick Reference Chart
Print this out and keep it handy:
| Symptom | Most Likely Cause | Section | DIY? |
| Site works for others, not you | Browser/DNS cache | III.E | ✅ Yes |
| Account suspended message | Billing issue | III.B.1 | ✅ Yes |
| Works sometimes, not others | DNS propagation | III.A.2 | ✅ Yes (wait) |
| Went down after WordPress update | Plugin conflict | III.C.1 | ✅ Yes |
| Resource limit messages | Exceeded hosting limits | III.B.2 | ✅ Yes |
| Red bars in cPanel | Exceeded hosting limits | III.B.2 | ✅ Yes |
| Domain expired | Expired domain | III.A.1 | ✅ Yes |
| Site loading old content | Cache issue | III.C.2, III.D.1 | ✅ Yes |
| 500 error | Server/code error | V | ❌ No |
| Database connection error | Database problem | V | ❌ No |
| Malware warning | Security breach | V | ❌ No |
| 403 Forbidden | Permissions/security | V | ❌ No |
| SSL/HTTPS errors | Certificate issue | V | ❌ No |
| White screen | Could be plugin or code | III.C.1 first, then V | ⚠️ Try DIY first |
And here is a flowchart that shows you the order in which to go through these items:
Here is the link to the spreadsheet where you can zoom in and out.
Question 1: Can OTHER people see your site?
Here’s the thing; if your site is down just for you, that’s a completely different problem than if it’s down for everyone. So test this properly:
- Go to IsItDownRightNow.com and check your site
- Ask a friend to try loading it
- Pull out your phone, turn off WiFi, and try on cellular
↳ YES, others can see it:
Your problem is local; something’s wrong with your browser or computer, not your site.
Go to: Section III.E (Browser/Local Issues)
Quick fixes to try:
- Clear your browser cache
- Flush your DNS
- Try a different browser
- Try incognito mode
↳ NO, nobody can see it:
Okay, now we’re dealing with a real site problem. Continue to Question 2.
Question 2: Can you log into your hosting control panel?
Try logging in at your hosting company’s website (the place where you pay for hosting, not WordPress).
↳ NO, can’t log in:
This might mean your account got suspended or you forgot your password.
What to do:
- Click “Forgot Password” and try to reset
- Check your email for any suspension notices from your hosting company
- Go to: Section III.B.1 (Billing/Suspension)
↳ YES, can log in:
Good. Your account is active. Continue to Question 3.
Question 3: Did you recently make ANY changes?
Think back over the last week. Did you change ANYTHING? And I mean anything; hosting, DNS, nameservers, WordPress updates, plugins, themes, Cloudflare settings. Be honest with yourself here.
↳ YES; Changed hosting, DNS, or nameservers:
Your problem is DNS propagation. This is actually normal, just annoying.
Go to: Section III.A.2 (DNS Changes)
What to expect:
- Takes 24 to 48 hours to fully propagate
- Nothing you can do to speed it up
- Totally normal part of the process
Important: Double-check that your nameservers match what your hosting company told you they should be. If you fat-fingered one character, that’s your problem right there.
↳ YES; Updated WordPress, plugins, or theme:
Your problem is a plugin or theme conflict. Something you updated broke something else.
Go to: Section III.C.1 (Plugin Issues)
Quick fix:
- Disable all plugins via File Manager (not WordPress admin, since you can’t access that)
- Figure out which one caused the problem
- Deal with that plugin specifically
↳ YES; Added or changed something in Cloudflare or another CDN:
Your problem is CDN cache. The CDN is serving old, broken content.
Go to: Section III.D.1 (CDN Issues)
Quick fix:
- Log into your CDN dashboard
- Find “Purge Cache” or “Clear Cache”
- Purge everything
- Wait 5 minutes
- Check your site
↳ NO changes made:
Nothing at all? Okay. Continue to Question 4.
Question 4: Check your domain expiration
Hate to break it to you, but this happens ALL THE TIME. People forget to renew their domain and then panic when their site disappears.
How to check:
- Go to Who.is
- Enter your domain name
- Look at the expiration date
↳ Domain is EXPIRED or expiring in the next 7 days:
There’s your problem.
Go to: Section III.A.1 (Domain Expiration)
Urgency level: HIGH. Stop reading and go fix this now.
Quick fix:
- Log into your domain registrar (GoDaddy, Namecheap, wherever you bought the domain)
- Renew immediately
- If you’re past the grace period, this might cost extra. Pay it.
↳ Domain is active (expires more than 30 days from now):
Okay, not a domain expiration issue. Continue to Question 5.
Question 5: Check hosting account status and resource usage
Log into your hosting control panel and actually LOOK at what’s on the screen. Are there any warnings, alerts, or angry red messages?
↳ See “Account Suspended” or “Payment Failed”:
Your problem is billing.
Go to: Section III.B.1 (Billing/Suspension)
Quick fix:
- Update your payment method
- Pay any outstanding balance
- Contact support to unsuspend your account
- They usually do this pretty quickly once you pay
↳ See “Resource Limit Reached” or red usage bars:
Your problem is that you’ve exceeded your hosting plan’s resources. Your site got too popular for your plan, or something is hammering your server.
Go to: Section III.B.2 (Resource Limits)
Quick fix (temporary):
- Wait for the automatic reset (usually happens daily or monthly)
Long-term fix:
- Upgrade your hosting plan
- This will keep happening until you do
↳ Everything looks normal, no warnings:
Interesting. Continue to Question 6.
Question 6: Look at your hosting email address
Search your email for messages from your hosting company in the last 7 days. Use these keywords: “maintenance,” “migration,” “upgrade,” “server,” “downtime.”
↳ Found email about scheduled maintenance:
Your problem is temporary hosting maintenance. The server is being worked on right now.
What to do:
- Check the email for the maintenance window
- Wait until it’s over (usually 1 to 4 hours)
- Your site should come back automatically
- No action needed from you
↳ Found email about server migration:
Your problem is DNS propagation from the migration. Your hosting company moved your site to a new server, and DNS is catching up.
Go to: Section III.A.2 (DNS Changes)
What to do:
- Wait 24 to 48 hours
- Should resolve automatically
- If it doesn’t, contact hosting support
↳ No relevant emails found:
Nothing about maintenance or changes? Continue to Question 7.
Question 7: Try accessing your site via IP address
This is a diagnostic trick that tells us whether your server is working but DNS is broken, or whether the server itself has a problem.
How to find your hosting IP:
- Log into your hosting control panel
- Look for “Server Information” or “Account Information”
- Find “Server IP Address” or “Account IP”
- Copy that IP address
- Try visiting: http://[your-ip-address]/
- Example: http://192.168.1.1/
↳ Site loads via IP but not via domain:
Your problem is DNS.
Possible causes:
- DNS records are incorrect
- Nameservers are wrong
- Recent changes are still propagating
What to do:
- Verify your DNS settings match what your hosting company says they should be
- Check that your nameservers are correct
- If you recently changed anything, wait 24 to 48 hours
↳ Site doesn’t load via IP either:
Your problem is server-level. Something is wrong with the server itself, not just DNS.
Go to: Section V (Need a Professional)
What to do:
- Contact your hosting support immediately
- Tell them the site won’t load even via IP address
- This is their problem to fix
Question 8: Can you access WordPress admin?
Try going to: yoursite.com/wp-admin
↳ Admin loads, but front-end site doesn’t:
Your problem is your theme. The WordPress backend is fine, but the theme that displays your site is broken.
Quick fix:
- Log into WordPress
- Go to Appearance > Themes
- Activate a default WordPress theme (Twenty Twenty-Four or whatever’s available)
- Check if your site loads now
- If yes: Your theme has a problem. Contact the theme developer or find a new theme.
↳ Get “Database Connection Error”:
Your problem is database-related. This is serious.
Go to: Section V (Need a Professional)
This requires expert help because it could be:
- Database credentials are wrong
- Database is corrupted
- Database server is down
↳ Can’t access admin at all:
Continue to Question 9.
Question 9: What error message do you see?
The specific error message tells us exactly what’s wrong. Here’s what each one means and what to do about it:
“This site can’t be reached” or “Server not found”:
Problems: DNS or domain issues
Check: Sections III.A.1 and III.A.2
“500 Internal Server Error”:
Problem: Server configuration or code error. Something on the server is broken.
Go to: Section V (Need a Professional)
“503 Service Unavailable”:
Problems could be:
- Resource limits (Section III.B.2)
- Server maintenance (temporary)
- Server overload from traffic spike
Try this: Wait 10 minutes and check again. If it’s still down after 30 minutes, contact hosting support.
“Error establishing database connection”:
Problem: Database issue. Your WordPress site can’t talk to its database.
Go to: Section V (Need a Professional)
“403 Forbidden”:
Problems could be:
- File permission issues
- Security plugin blocking you
- .htaccess problem
Go to: Section V (Need a Professional)
“404 Not Found” on ALL pages:
Problem: .htaccess or permalink issue. Your site’s URL structure got messed up.
Quick fix attempt:
- Log into WordPress admin (if you can)
- Go to Settings > Permalinks
- Click “Save Changes” without changing anything
- Check your site
If that doesn’t work: Go to Section V (Need a Professional)
“Your connection is not private” or SSL error:
Problem: SSL certificate issue. Your security certificate is expired, invalid, or misconfigured.
Go to: Section V (Need a Professional)
White screen, no error message:
Problems could be:
- Plugin conflict (Section III.C.1)
- PHP error
- Memory limit exceeded
Try this first: Use the disable plugins method from Section III.C.1
If that doesn’t work: Go to Section V (Need a Professional)
“Too many redirects”:
Problems could be:
- WordPress URL settings are wrong
- .htaccess redirect loop
- Cloudflare SSL setting is incorrect
If you’re using Cloudflare:
- Log into Cloudflare
- Go to SSL/TLS settings
- Change SSL setting to “Full” (not “Flexible”)
- Wait 5 minutes and check
Otherwise: Go to Section V (Need a Professional)
V. Landed on “Need a Professional?”
If you followed this decision tree honestly and it led you to a “Need a Professional” section, don’t try to be a hero. Some problems require expertise you don’t have, and that’s okay. Spending three hours Googling random solutions usually costs more than just hiring someone who knows what they’re doing.
And if you got stuck or the diagnostic didn’t lead you to a clear answer? That’s what we’re here for at JHMG. We’ve diagnosed hundreds of these issues, and we can usually spot the problem in minutes.
Red Flags That Require Expert Help
⚠️ STOP and call a professional if you see any of these:
1. Security Issues
Hacked/Malware Warnings:
What you might see:
- Google warning: “The site ahead contains malware”
- Browser warning: “Deceptive site ahead”
- Hosting suspension notice: “Malware detected”
- Weird pop-ups or redirects to other sites
- Strange administrator accounts you didn’t create
- Files you don’t recognize in your hosting
- Emails being sent from your domain that you didn’t send
Why you shouldn’t DIY:
- Hackers often leave multiple backdoors
- You might miss hidden malware
- Cleaning one part might trigger more problems
- Could compromise sensitive data
- May violate hosting terms if not properly cleaned
What professionals do:
- Full security audit
- Malware scanning and removal
- Backdoor detection and closure
- Database cleaning
- Password reset for all accounts
- Security hardening
- Monitoring setup
Immediate steps YOU should take:
- Don’t delete anything yet
- Change your hosting password
- Change your WordPress admin password (if you can access)
- Document what you see (screenshots)
- Contact professional immediately
How much it costs: $150-$2000+ for professional cleanup for a small site. Could be a lot more for a big one.
2. Database Errors
“Error Establishing Database Connection”:
What this means:
- WordPress can’t talk to its database
- Could be wrong credentials
- Could be corrupted database
- Could be database server problem
Why you shouldn’t DIY:
- One wrong move can delete all your content
- Requires direct database access
- Need to know SQL
- Could make data unrecoverable
What professionals do:
- Check database credentials in wp-config.php
- Verify database server is running
- Repair corrupted tables
- Restore from backup if needed
- Fix database server issues with host
What you CAN try (low risk):
- Contact your hosting support first
- They can check if database server is running
- They can verify your database exists
3. Server Configuration Errors
500 Internal Server Error:
What this means:
- Something is wrong with server configuration
- Could be .htaccess file
- Could be PHP configuration
- Could be file permissions
- Could be code error
What you’ll see:
- “500 Internal Server Error” message
- Sometimes: “The server encountered an internal error”
- Blank white page with error in upper corner
Why you shouldn’t DIY:
- Requires understanding of server configuration
- Incorrect .htaccess edits can make things worse
- May need server-level access
- Could be PHP version incompatibility
What professionals do:
- Check error logs to find exact cause
- Fix .htaccess syntax errors
- Adjust PHP settings
- Fix file permission issues
- Debug PHP errors in code
What you could try first, but only if you know what you’re doingt:
- Rename .htaccess file (via File Manager):
- Find .htaccess in public_html
- Rename to .htaccess-old
- Check if site works
- If yes: .htaccess was corrupt
- WordPress will regenerate it
- If that doesn’t work: Call pro
4. DDoS Attack or Severe Traffic Issues
What’s a DDoS attack?
- Thousands of fake visitors hit your site at once. You can often see this on your system analytics as well. In Google Analytics, it will often show up as an anomaly notice.
- Overwhelms your server
- Makes site unavailable for real visitors
- Malicious attack, not legitimate traffic
Signs of DDoS:
- Site suddenly crashes under extremely high traffic
- BUT you’re not expecting high traffic
- Hosting says “abnormal traffic patterns”
- Traffic comes from many different IPs
- Server resources maxed out instantly
- Site goes down, comes up, goes down repeatedly
Why you shouldn’t DIY:
- Requires server-level traffic analysis
- Needs professional DDoS mitigation – CloudFlare can usually handle this.
- Could be ongoing attack
- Basic solutions won’t work
What professionals do:
- Implement DDoS protection (Cloudflare, Sucuri)
- Block attacking IP ranges
- Set up rate limiting
- Configure web application firewall (WAF)
- Work with hosting company on server-level blocks
Immediate steps:
- Contact your hosting company immediately
- Tell them you suspect DDoS attack
- They have tools to verify and mitigate
- Consider turning on Cloudflare DDoS protection
5. SSL/HTTPS Certificate Problems
“Your Connection is Not Private” / “NET::ERR_CERT_DATE_INVALID”:
What this usually means:
- SSL certificate expired
- SSL certificate not installed correctly
- Mixed content issues (http and https)
- Certificate doesn’t match your domain
Why you shouldn’t DIY:
- Requires server-level access
- Certificate installation is complex
- Wrong steps can make it worse
- May require validation with certificate authority
What professionals do:
- Renew or install SSL certificate
- Fix certificate chain issues
- Update WordPress URL settings
- Fix mixed content warnings
- Set up proper redirects
What hosting support can do:
- Many hosts offer free SSL (Let’s Encrypt)
- They can install it for you
- Contact them first before hiring outside help
6. File Permission Problems
403 Forbidden Error:
What this means:
- File permissions are set incorrectly
- Server won’t serve the files
- Could be security plugin blocking access
- Could be .htaccess rules
Why you shouldn’t DIY:
- Incorrect permissions create security vulnerabilities
- Need to know correct permission numbers
- Different files need different permissions
- Could lock yourself out completely
What professionals do:
- Set correct file permissions:
- Directories: 755
- Files: 644
- wp-config.php: 440 or 400
- Fix ownership issues
- Adjust security plugin settings
- Fix .htaccess rules
Exception – You could try this if you know what you’re doing:
- If you’re comfortable with File Manager
- Set directories to 755
- Set files to 644
- But if uncertain, hire a pro
7. Email Suddenly Stopped Working Too
If your website is down AND email stopped:
This usually indicates:
- Server-level problem
- DNS problem affecting multiple services
- Hosting account suspended
- Nameserver issue
Why you shouldn’t DIY alone:
- Affects multiple critical services
- Requires coordinated DNS/server fixes
- May need to work with multiple services
- Higher stakes with business email
What to do:
- Contact hosting support immediately
- This is likely their issue to fix
- Verify account isn’t suspended
- Check nameservers haven’t changed
8. Site Repeatedly Goes Down After You “Fix” It
Pattern to watch for:
- You fix something
- Site comes back up
- Goes down again within hours/days
- Repeat cycle
This means:
- You’re treating symptoms, not cause
- Root problem is still there
- Could be ongoing attack
- Could be resource issues
- Could be code problem
Why you need a professional:
- They’ll find the root cause
- They have diagnostic tools you don’t
- They can implement permanent solutions
- Prevents repeated downtime
How to Know It’s Time to Call
Ask yourself these questions:
- Have I tried the appropriate DIY fix from Section III?
- Yes, and it didn’t work → Call pro
- No → Try DIY first
- Do I see any of the red flags listed above?
- Yes → Call pro immediately
- No → Continue DIY troubleshooting
- Has the site been down for more than 4 hours?
- Yes, and hosting support hasn’t helped → Call pro
- No → Keep trying
- Am I comfortable with the technical steps required?
- No → Call pro
- Yes → Proceed carefully
- Is this affecting my business/income?
- Yes significantly → Call pro immediately
- No or minimal → You can keep troubleshooting
- Do I have a recent backup?
- No → Call pro (they may be able to recover data)
- Yes → You have safety net to try DIY
What to Prepare Before Calling a Professional
Have this information ready:
- Error Messages
- Exact text of any errors
- Screenshots of errors
- Error codes (403, 500, 502, etc.)
- Timeline
- When did the site go down?
- What were you doing before it went down?
- Any recent changes? (updates, new plugins, etc.)
- Access Information (have available, don’t share until verified professional)
- Hosting account login
- WordPress admin login
- Domain registrar login
- FTP/cPanel credentials
- Database credentials (if you have them)
- Hosting Information
- Who is your hosting company?
- What plan are you on?
- Server type (shared, VPS, dedicated)
- Website Details
- WordPress version (if you know)
- Active theme name
- Key plugins you use
- Any custom code/development
- What You’ve Already Tried
- List what steps you’ve taken
- What worked/didn’t work
- What you saw happen
Where to Get Help
Option 1: Support My Website
- Specializes in: Website maintenance, emergency fixes, security
- Response time: 9am to 5pm EST Monday through Friday
- Best for: WordPress sites, ongoing maintenance needs
- Contact: This website – just go to the home page or hit the “Get Started” button at the top of the page!
- What we do:
- Emergency fixes
- Security cleanup
- Ongoing maintenance plans
- Prevent future issues
Option 2: Your Hosting Company Support
- Best for: Server-level issues, account problems, basic WP help
- Usually included free with hosting plan
- Response time: Varies by host (chat, phone, tickets)
- Good for:
- Server errors
- Resource limit issues
- SSL installation
- Email problems
- Account suspension issues
Option 3: Developer/Agency
- Best for: Complex code issues, custom development problems
- Cost: $150/hour
- Find them: jhmediagroup.com
Option 4: Security Specialists
- Sucuri WordPress plugin: malware removal, security hardening ($199+ one-time or subscription)
- Wordfence: security scanning and cleanup
- NOTE: don’t use both Sucuri and Wordfence. You can only have one or the other.
- Best for: Hacked sites, ongoing security needs
Red Flags When Hiring Help
As much of a hurry you may be in to get your site back up and running, make sure you don’t get robbed on top of it! We’ve gotten so many calls over the years from people telling us their site went down, then the people they called couldn’t or didn’t help. Here’s what to watch out for!
Watch out for:
- Asking for payment before explaining the problem
- Guaranteeing they can fix it in X minutes without diagnosing
- Asking for more access than needed
- No clear pricing/estimates
- Pressure to buy additional services immediately
- Won’t explain what they’re doing – ask them to explain exactly what they are going to do for you
- You have valuable data on your site, get them to sign a Non-Disclosure Agreement (NDA)!
- No references or reviews
Good signs:
- Asks diagnostic questions first
- Explains what they’re checking
- Provides estimate before starting work
- Communicates clearly in terms you understand
- Has reviews/testimonials on Google or Clutch
- Offers preventive advice
- Provides documentation of work done
Prevention: Stop It From Happening Again
Look, the best downtime is the downtime that never happens. Period.
I’ve seen businesses lose thousands of dollars because they didn’t spend 10 minutes setting up auto-renew on their domain. I’ve watched sites go down because someone forgot to update an expired credit card. It’s maddening because ALL of this is preventable.
So here’s exactly what to do. Some of this takes five minutes right now. Some of it takes 30 minutes per month. But I promise you, it’s cheaper than dealing with your site being down at 2 AM on a Friday.
5-Minute Prevention (Do These RIGHT NOW)
1. Set Domain to Auto-Renew
Why this matters:
This is the number one cause of preventable downtime. You get busy, you forget the renewal date, and suddenly your site disappears. The grace period might save you, but it’ll cost you stress and potentially money.
How to do it:
Step 1: Log into your domain registrar (GoDaddy, Namecheap, Google Domains, wherever you bought the domain).
If you don’t remember where that is, search your old emails for “domain registration” or “domain purchase.”
Step 2: Find your domain.
Look for “My Domains” or “Domain Management” in the menu.
Step 3: Enable auto-renewal.
Look for a checkbox or toggle. Usually says “Auto-Renew” or “Automatic Renewal.” Turn it ON. Not later. Now.
Step 4: Verify your payment method.
Make sure the credit card on file is current and doesn’t expire soon. If your card expires in the next six months, update it now. Better yet, consider using PayPal or a bank account; those don’t expire.
Step 5: Set a backup reminder anyway.
Put a calendar reminder 60 days before expiration. Just in case auto-renew fails (payment issues, card expired, whatever), you’ll have a heads-up to double-check it renewed.
Takes: 3 minutes
Prevents: 30% of website downtime
2. Update Payment Information
Current payment method check:
For hosting:
- Log into your hosting account
- Go to Billing > Payment Methods
- Look at the card expiration date
- Is it expiring in the next six months? Update it NOW, not when it expires.
For domain:
- Same process
- Different company might have a different card on file
- Check both places
Best practice:
- Use a credit card that doesn’t expire soon
- Or use PayPal or a checking account (doesn’t expire)
- Update BEFORE expiration, not after
- Set a calendar reminder one month before any card expires
Takes: 5 minutes
Prevents: 25% of website downtime
3. Set Up Uptime Monitoring
What it does:
Checks your site every 5 to 30 minutes, alerts you immediately if it goes down, and shows you uptime history. The key here is catching problems fast instead of finding out three hours later when a customer emails you.
Best free option: UptimeRobot
Setup steps:
Step 1: Go to UptimeRobot.com
- Click “Sign Up Free”
- Enter your email and create a password
- Verify your email
Step 2: Add your website
- Click “Add New Monitor”
- Monitor Type: HTTP(s)
- Friendly Name: “My Website” (or whatever you want to call it)
- URL: https://yourwebsite.com
- Monitoring Interval: 5 minutes (on the free plan)
Step 3: Set up alerts
- Email alert: Enter your email address
- SMS alert: Enter your phone number (optional but recommended)
- Verify both
Step 4: You’re done.
You’ll get an email immediately if your site goes down. The dashboard shows your uptime percentage. The free plan monitors up to 50 sites, which is way more than most people need.
Alternative options:
- Pingdom (paid, more features)
- StatusCake (free option available)
- Freshping (free for up to 50 sites)
- Jetpack Monitor (if you’re already using Jetpack)
Takes: 10 minutes
Benefit: Know immediately when your site goes down, not hours later when you’ve already lost business
4. Create Website Emergency Contact List
Print this out and keep it somewhere you can actually find it. Not buried in a folder on your desktop. PRINT IT.
Template:
Where to keep it:
- Print it out and keep it near your computer
- Save a digital copy in your password manager
- Save another copy in Google Drive or Dropbox
- Share it with your business partner or team members
Takes: 10 minutes
Benefit: Saves hours when an emergency happens and you’re panicking
Monthly Maintenance (Literally 30m per month)
Set a monthly reminder for these tasks. First Monday of every month works great. Put it in your calendar right now.
1. Check Domain Expiration (Even with Auto-Renew)
Why: Auto-renew can fail. Payment issues, expired cards, bank declines; I’ve seen it all, and it happens more than anyone realizes. Here’s the easy way to check:
Steps:
- Visit Who.is
- Enter your domain
- Verify the expiration date is still far away
- Check that auto-renew is still enabled
Takes: 2 minutes
2. Review Hosting Resource Usage
Why: Catch problems before they cause downtime. If you’re consistently hitting 80% of your resources, you’re one traffic spike away from your site going down.
Steps:
- Log into your hosting control panel
- Check CPU, memory, and bandwidth usage
- Look for trends (usage going up over time?)
- If you’re regularly over 70%, start planning to upgrade
Takes: 5 minutes
What to look for:
- Resource graphs or charts
- Any warnings or notifications
- Comparison to last month
- Red or orange indicators (bad news)
3. Update WordPress, Plugins, and Themes
Why: Security and compatibility. Outdated software is the number one way sites get hacked.
The safe way:
Step 1: Make a backup FIRST. DON’T SKIP THIS STEP!
Use UpdraftPlus or your hosting company’s backup tool. Download the backup to your computer. Verify it completed successfully. Don’t skip this.
Step 2: Update one thing at a time.
- Log into WordPress admin
- Go to Dashboard > Updates
- Update WordPress core first (if available)
- Check that your site still works
- Update plugins one at a time
- Check your site after each one
- Update your theme last
- Check your site again
Step 3: Test your site.
- Visit the homepage
- Click through key pages
- Test contact forms
- Check mobile view
- Make sure nothing broke
Takes: 20 minutes
Pro tip: Do this during off-hours, not in the middle of your business day. If something breaks, you want time to fix it without customers noticing.
4. Test Your Backup
Why: Backups are completely useless if they don’t actually work. And you’d be shocked how many backups don’t work. We had this happen a while back and it is what made us move to fast refresh off-site backups on AWS. We had a backup that completely failed several years ago and what a nightmare that was. On the upside, we did get it working again, but the site was down for more than 5 hours, and that’s embarrassing.
Steps:
- Locate your most recent backup
- Download it
- Verify it’s not corrupted (file opens, isn’t 0 KB)
- If possible, test a restore on a staging site
- Make a note of the backup date
Takes: 5 minutes (a full restore test takes longer, but do that quarterly)
Critical point: Just like what happened to us, many people have backups that don’t work. They find out during an emergency when it’s too late. Don’t be that person. Test at least once per quarter. Or better yet, automate your testing.
5. Security Scans
Why: Catch security issues before they cause downtime or your site gets blacklisted.
Using Wordfence (free plugin):
- Log into WordPress
- Go to Wordfence > Scan
- Click “Start New Scan”
- Wait for results (10 to 20 minutes)
- Fix any issues found
Or use Sucuri SiteCheck (free, external) or Wordfence (below is Sucuri):
- Go to SiteCheck.Sucuri.net
- Enter your domain
- Review scan results
- Follow recommended fixes
Takes: 5 to 10 minutes (plus scan time)
Quarterly Tasks
1. Full Backup Review
- Verify all backups completed successfully for the past three months
- Download a copy to an external drive
- Test a restore (actually do this)
- Update backup settings if needed
2. Password Update
- Change your WordPress admin password
- Change your hosting password
- Change your FTP password
- Use strong, unique passwords (use a password manager)
3. Plugin Audit
- Remove unused plugins completely (don’t just deactivate them)
- Research your active plugins (any with known issues?)
- Look for alternatives to bloated plugins
- Check for abandoned plugins (not updated in over a year; delete those immediately)
4. Review Uptime Reports
- Check UptimeRobot statistics
- Review downtime incidents
- Identify patterns (always down at the same time? Same day of the week?)
- Address recurring issues
Annual Tasks
1. Hosting Plan Review
Questions to ask:
- Is your hosting still meeting your needs?
- Have you outgrown your current plan?
- Are there cheaper or better options available?
- Did you have good uptime this year?
- Are you happy with support?
Consider upgrading if:
- You’re hitting resource limits regularly
- Your site has slowed down noticeably
- Your business has grown significantly
- You need better support than you’re getting
2. Complete Site Audit
Either hire a professional (that’s what we do at JHMG) or do it yourself:
- Check all links (any broken?)
- Test all forms
- Review analytics (speed, performance trends)
- Security audit
- SEO check
- Content review
3. Disaster Recovery Plan
Document:
- How to restore from backup (step by step)
- Who to contact in emergencies
- Step-by-step recovery procedures
- Critical passwords and access information
Then TEST the plan. Actually walk through it. Pretend something went wrong and run the FULL test.
Smart Investments (Worth the Cost)
Managed WordPress Hosting
What it is:
Hosting optimized specifically for WordPress. You get automatic updates, better security, better support, daily backups included, and staging sites for testing changes.
Who offers it:
- Kinsta (premium) – This is who we use.
- WP Engine (premium) – we used to use WP Engine, but they got in trouble with WordPress a while back and their reputation dropped a good bit.
- Flywheel (mid-range)
- SiteGround (good mid-range option)
Worth it if:
- You run a business site
- You don’t want to worry about technical stuff
- You value your time
- You want better performance
A Professional Maintenance Plan With SupportMy.Website
What you get:
- Regular updates (WordPress, plugins, themes)
- Daily backups with off-site storage
- Security monitoring and scans
- Uptime monitoring
- Performance optimization
- Priority support when issues arise
- ADA compliance checks
- UX improvement recommendations
- Conversion improvement recommendations
- Marketing analysis and updates
- Monthly site edits and additions
- And more!
Worth it if:
- You’re too busy to do maintenance yourself
- You’re not comfortable with technical tasks
- You want peace of mind
- You can’t afford downtime
ROI calculation:
- One emergency fix: $150 to $5000 – potentially much more for big sites
- Lost business during downtime: How much is that for you?
- Your time spent troubleshooting: Is it worth your time when you could just make a phone call?
- Maintenance plan: $150 – $1500/month, depending on what you need.
This pays for itself the first time you have an emergency, and usually after a month or two of time you get back.
Quality Security Plugin
Free options:
- Wordfence (excellent free version)
- Sucuri Security (free version)
Paid options:
- Wordfence Premium ($99/year); real-time threat defense
- Sucuri Platform ($200/year); includes cleanup guarantee if you get hacked
- iThemes Security Pro ($80/year)
What they do:
- Real-time security monitoring
- Firewall protection
- Malware scanning
- Brute force protection
- Login security
- File change detection
Worth it if:
- You handle sensitive data
- You run an e-commerce site
- You have a high-traffic site
- You’ve had previous security issues
CDN (Content Delivery Network)
Cloudflare; Free plan available:
- Faster page loads
- DDoS protection
- “Always Online” feature (shows cached version if your site goes down)
- Free SSL certificate
- Reduces load on your server
Setup:
- Sign up at Cloudflare.com
- Add your site
- Change nameservers at your domain registrar
- Follow Cloudflare’s setup wizard
Takes: 20 minutes
Cost: Free (paid plans start at $20/month for more features)
Benefit: Faster site, better security, redundancy
Prevention Checklist Summary
Print this and check it monthly:
☐ Domain auto-renew enabled and verified
☐ Payment methods current (hosting AND domain)
☐ Uptime monitoring active
☐ Backup completed successfully this month
☐ WordPress, plugins, and themes updated
☐ Security scan completed (no issues found)
☐ Hosting resources checked (under 70%)
☐ No warning emails from hosting or domain company
☐ Site speed acceptable
☐ Contact list up to date
This takes 30 minutes per month and prevents 90% of website downtime.
Now you know all the stuff we do!
Now you can start your own website support company! Seriously though, prevention is great, but sometimes stuff breaks one way or another. Server migrations go wrong. Hosting companies make mistakes. Plugins conflict in ways nobody predicted. And sometimes you just don’t have time to deal with it.
That’s exactly why we built Supportmy.website.
We specialize in website support and maintenance (most often WordPress websites) that are down, broken, hacked, or just acting weird. No long-term contracts. No monthly retainers you don’t need – we only recommend ongoing work if it’s going to be valuable to you. Just fast, expert help when you actually need it.
What we do:
- Diagnose the problem quickly (usually within minutes)
- Fix it the right way, not the quick-and-dirty way
- Explain what happened in plain English
- Show you how to prevent it from happening again
- Get your site back online fast
We’ve seen every possible way a website can break. The weird ones. The “how is that even possible” ones. The ones where three different things broke at the same time. And we know how to fix them.
If you’ve gone through this guide and you’re still stuck, or if you just don’t want to deal with it yourself, head over to Supportmy.website and tell us what’s going on. We’ll take it from there.
Your time is valuable. Sometimes the smartest move is letting someone who does this every day handle it while you get back to running your business.
Author:
Jason Long, CEO
Jason Long is the founder and CEO of JHMG and SupportMy.Website. He is a serial problem solver and entrepreneur with 25 years of experience in business building. Jason’s ventures range from agriculture to healthcare with a focus on web-based technology. He has extensive experience in software development and have operated as a developer, UX designer, graphic designer, project manager, director, executive coach, and CEO. At JHMG, he operates not only as the leader of the organization, but also as a SaaS Consultant helping businesses start, build, grow, scale, and exit their SaaS businesses.
Jason is also an experienced world traveler who regularly visits destinations worldwide, and is passionate about community growth, social issues, fitness, and family.
Jason Long’s Linkedin
Website: JasonMLong.me
X: @jasonmlong