You're in a pickle. One of your favorite websites won't load properly. Your computer whiz nephew says you need to clear your cache, but what in tarnation is a cache?
And why are you suddenly quoting Yosemite Sam?

Well, hey! No worries! That's what we're here for - no need to shoot your computer. Unless maybe it's a Dell.
But even then, we can show you how to clear your cache first. It's actually pretty easy! In fact, here's a video walk-through. If you'd rather read/skim, just scroll past the video and keep going.
What Is A Website Cache?

A website cache is a stored copy of the website files that your browser keeps in order to assist in loading the website faster the next time it loads.
How Does a Browser Cache Work?
When you go to a website for the first time, it takes longer to load than any subsequent visits will. This is because your computer has to download every single bit of data for each page you visit on the site. The images, text, etc. All of it.
But the bigger things, such as images, are held over in a special cache folder. So next time you visit the site, your computer only has to download the new things, so the site loads faster.
And there are actually two different kinds of caches:
- Browser caches, which we're focusing on here.
- And Website Caches, which you can find more info on by clicking the link.
Each one does the same thing, just from a different angle. In short, website caches are caches created by site owners to make their site faster for visitors, and browser caches are created by a person's web browser to accelerate load times on commonly-visited sites.
So Why Would I Want To Clear My Cache?
Good question. I mean, if I had a McGuffin that guaranteed green lights at every intersection as long as I didn't, for example, turn on the radio, I would drive in silence quite a bit more. But sometimes you just need some music.
But what do you get for clearing your cache? Sometimes, a site will start acting strangely. Or it won't show updated information, despite that you KNOW there's supposed to be big news today for your favorite entertainment franchise, sports team, musical act, etc, and people are reacting on social media already, and if you see just one more "OMG", you're gonna blow! But the site won't load!
Well, assuming that their servers haven't melted down, the problem is most likely on your end. The first step is always to clear your cache.
What happens is, sometimes, when your computer hops over to your favorite web address, and says, "Hey, there, favorite-site-ever, what's new?", the site's server responds with "Same old same old." And your browser will check and say, "Well, I've got these cached files from yesterday...", but all it gets is a shrug and, "Well, looks fine to me!"
Clearing your cache, on the other hand, is like your browser showing up with amnesia, saying "I'm new here" and getting the full starter kit of everything.
Pro-tip: You can actually test whether you might need to clear your cache by using Chrome's Incognito Mode. This would be like your browser showing up in disguise and feigning ignorance to get the full breakdown. This is because Incognito Mode uses a different, temporary cache that is deleted when the window closes. But you don't want to have to use Incognito all the time, so you'd want to just clear your cache for standard browsing to save headaches down the road.
Any other questions?
Alright, so let's get down to business, then.
Clearing Your Cache In Google Chrome: A Walkthrough
There are actually three ways to do this:
- A Basic method
- An Advanced method (which is actually just a click away from the Basic)
- And a Super-Secret Smart Guy/Gal (SSSG) method (aka. how developers do it)
We'll start with Basic, of course. But stick around, because you might benefit from the extra knowledge. Because, to be completely honest, even the SSSG method is super easy once you know about it, and possibly the most useful - especially if you're having trouble with just one site.
The first step, with Google Chrome open, is to click on the three vertical dots at the top-right of the page.
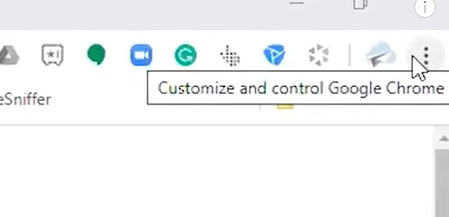
They're pretty easy to spot. See?
Next, go down to "More Tools", then to "Clear Browsing Data".
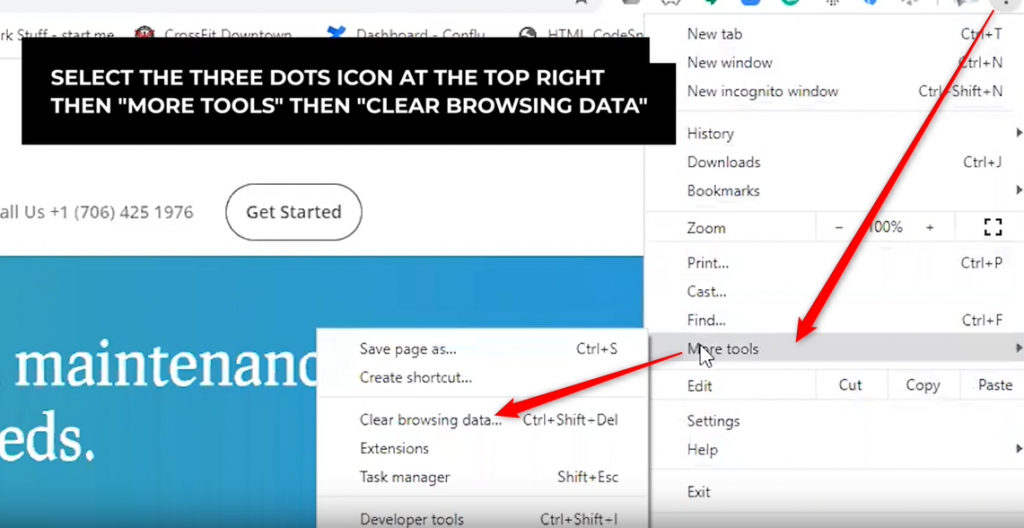
Pro-tip: If you look to the right of where it says "Clear Browsing Data", you'll see the keyboard shortcut for this command is Ctrl+Shift+Delete. So, without clicking anything at all, you can reach the same menu that pops up if you click on "Clear Browsing Data" right here.
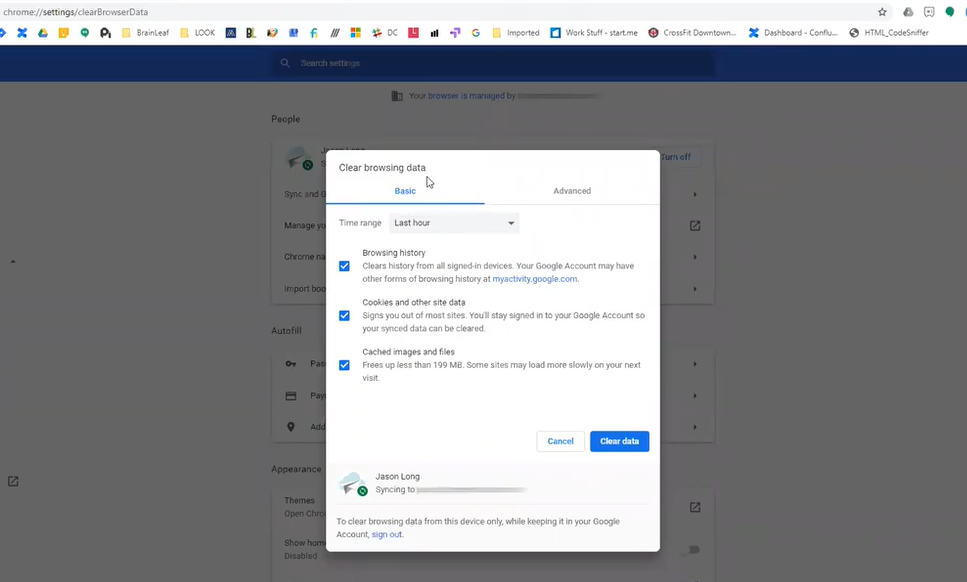
No matter how you get there, this is the screen you'll see once you're there. The menu pops up in a lightbox, meaning it sort of floats over the rest of the screen, with the background faded out.
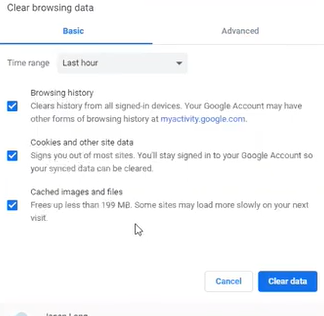
Basic options for clearing your cache
Your options are straightforward, especially for your "Basic" method. You can delete:
- Browsing History - This is a list of what sites you have visited and when. Important if you've been to certain places that your parents/wife/girlfriend/children, or, well, anybody, just has no business knowing about. Most commonly used to hide where you're buying birthday, Christmas, or anniversary (HINT) presents from.
- Cookies and Other Site Data - This is your login data for sites you've visited, and how sites track your individual activity (such as what items go into your shopping cart prior to checkout). Here's a solid breakdown if you want to know more. But the most immediate implication is that leaving this checked means you will have to log back into, well, everything.
- Cached Images and Files - This is your cache. If your only concern is clearing your cache (and since you're reading this article, this is likely the case), then this is the only one you need to leave checked.
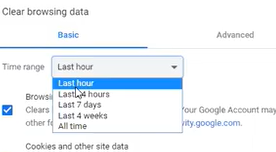
There is one further consideration under the "Basic" method - timeframe. You no longer have to delete your entire cache, browsing history, etc. You can limit it to, strictly, the new items picked up in the last hour, day, week, or month. Or stick with "All Time" to purge everything and imagine the world burning.
Although, if this is a site you've been visiting for a long time, then "All Time" might honestly be your best bet. For clearing your cache, doing anything less is often ineffective. But the timeframe considerations are still good options for the other things.
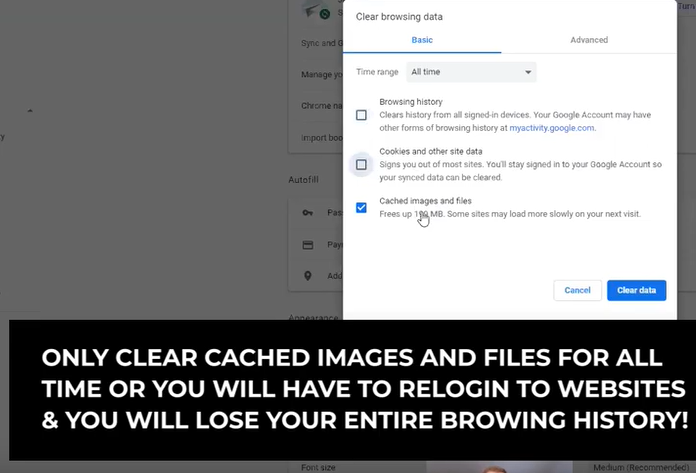
And there you have it. The above image shows you the "Basic" method completed and ready to hit that "Clear Data" button.
But there are still two more methods to cover, and one of them is on this same screen.
Advanced options for clearing your cache
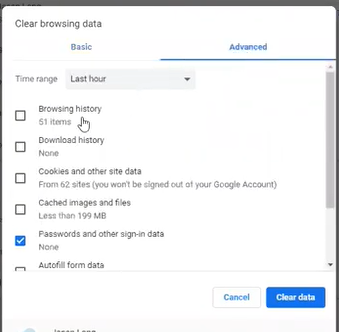
The "Advanced" method is an adjacent tab to what we just looked at. And it's largely the same thing, just with a few more detailed options:
- Browsing History
- Download History - The detailed list of everything you've downloaded.
- Cookies and Other Site Data
- Cached Images and Files
- Passwords and Other Sign-In Data - If you've asked your browser to save passwords to make signing in easier on certain sites, this would delete them.
- Autofill Form Data - Autofill makes filling in forms easier by automatically entering your name, address, etc. for you.
- Site Settings - Some sites ask for specific permissions (Can we access your location? Can we send you notifications? Can we store cookies on your PC?), and this would clear those.
- Hosted App Data - This is the most relevant additional option under "Advanced" for clearing your cache. This applies to apps that were installed through the Chrome Web Store, or that are running through Chrome, such as Gmail or Outlook.
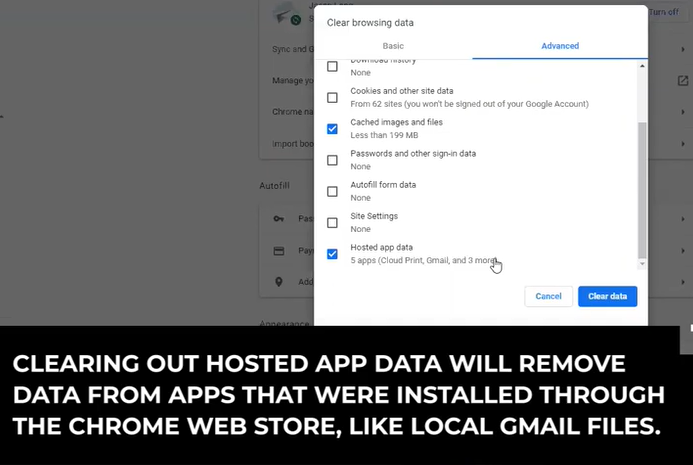
So the major leg-up that the "Advanced" method has over "Basic" is that you get this additional option for dealing with these hosted apps. Sometimes these encounter problems and need this, but if the problem is a standard site, then "Basic should work.
How Developers Clear Their Cache
That just leaves the most advanced technique, our SSSG method.
The Inspector
This method starts by pulling up the Developers' Tools. Right-click anywhere on the page, and then click on the "Inspect" option in the menu that pops up.
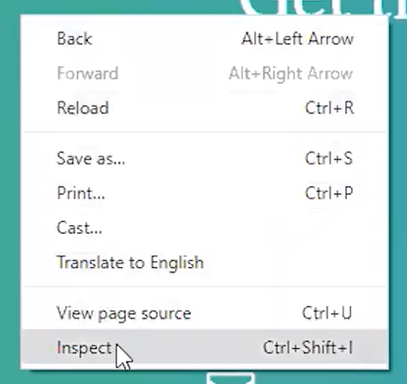
There is also a keyboard shortcut for this: Ctrl+Shift+I (that's an uppercase 'I', not a lowercase 'L').
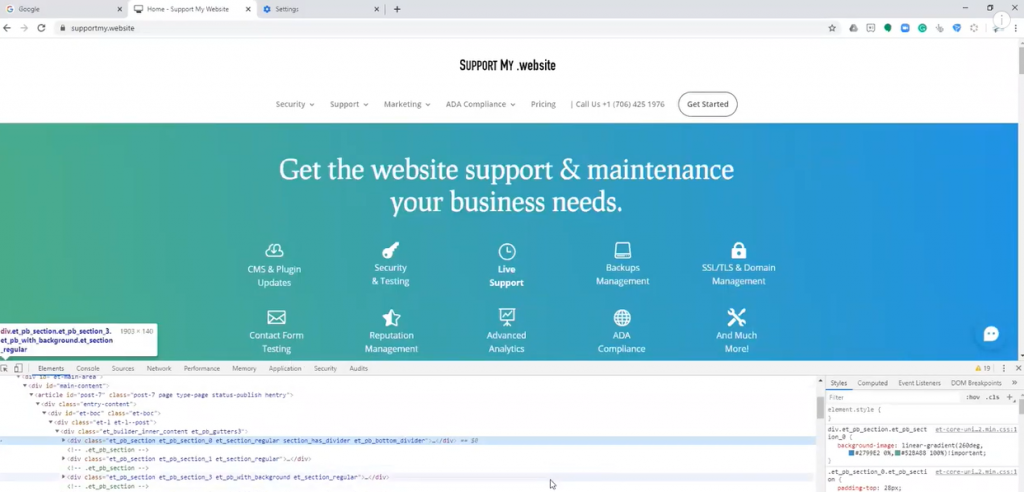
A window will open on the screen. Here, it's opened on the bottom, but it most often shows up on the right. These are the Developers' Tools. They allow you to see the raw code for the page you're looking at to see how everything is put together. This is also sometimes called a Browser Inspector, or just an Inspector.
Related Side-Note: Kids these days like to open this up and pretend they're hacking. Which is honestly kinda cool once they figure out how to change the display text for the page they're on (just on their display - they can't actually change what's on the server for the site's other visitors).
But don't worry too much. This isn't a coding guide. You don't need to do anything with that pane. We just need it open to enable a hidden feature (which a surprising number of actual web developers don't know about!).
Clearing Your Cache With The Inspector

Now, with the Inspector sitting open, ignore it and mouse up the 'Refresh' button at the top left of the screen, right between the Forward/Back buttons and the URL bar.
Leaving the cursor on the button for a moment will show that it now has a secondary function! If you click and hold, then it'll bring up a list of options.
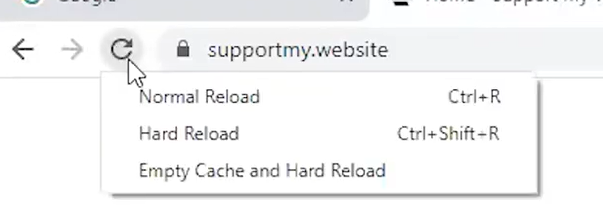
Available options for clearing cache with the inspector
Here it is! This is the SSSG option. But which one do you need to click?
- Normal Reload - A normal refresh, just as if you clicked the button without pulling up the Inspector at all. The browser inquires with the site's server whether changes have been made, and loads up the site again. This is only worth clicking if you haven't already tried a basic refresh of the site.
- Hard Reload - A hard reload ignores the cache and asks the site to provide everything from scratch. You download everything again. In this way, it simulates an empty cache.
- Empty Cache and Hard Reload - This third option starts by emptying the cache for this specific site, and then follows through with a hard reload. So instead of clearing your cache for every site, you wipe out just the files and images that your browser had previously downloaded from this site. If this particular site is the problem, then this should fix it.
So, typically, we advise reloading in progression: try a standard refresh first, then Hard, then Empty Cache and Hard. And if the cache for this specific site is the problem, this will fix it.
Ergo, if this doesn't fix it, you'll have to try a broader cache emptying.
If that doesn't work, then maybe the problem was never your cache to begin with. In that case, hit us up! We're always happy to help you figure things out.
If you're interested in learning more about things like website caches, updating plugins, and all the other things you need to do to keep your website running smoothly, take a look at our extensive article on the proper care and feeding of your website!